Understanding Container Architecture
Docker containers are widely used in the deployment of moderns apps. In this post, you will learn the concept of containerizing, the security mechanism used by the docker community and how to interact with container via docker

Hello World! Nowadays docker is a new buzz word and everyone wants to get their apps deployed on the docker containers. Although there are so many other containerisation tools out there in the market, I will be talking more about docker, because it is popular among all of them.
Learning docker architecture in depth will take another set of posts and series. In this post, I will be discussing the basics of containers required from an infosec point of view. Also in the upcoming posts, I will be discussing the exploitation techniques to break out of the containerised environment
Containerization vs Virtualization
Traditionally to isolate the development and deployment process, developers used the hardware-level isolation technique, "virtualization". In this case, a new layer of hypervisor sits on top of the host machine to provide hardware-level isolation. It got popular as anyone then can run multiple operating systems on the main host machine.
In virtualization, two or more OS along with running host machine are completely isolated, which means one OS doesn't know the processes of the other or even CPU and Memory are isolated. This whole thing is managed by a hypervisor. It is only possible to break out virtualization if there is some vulnerability in the hypervisor itself.
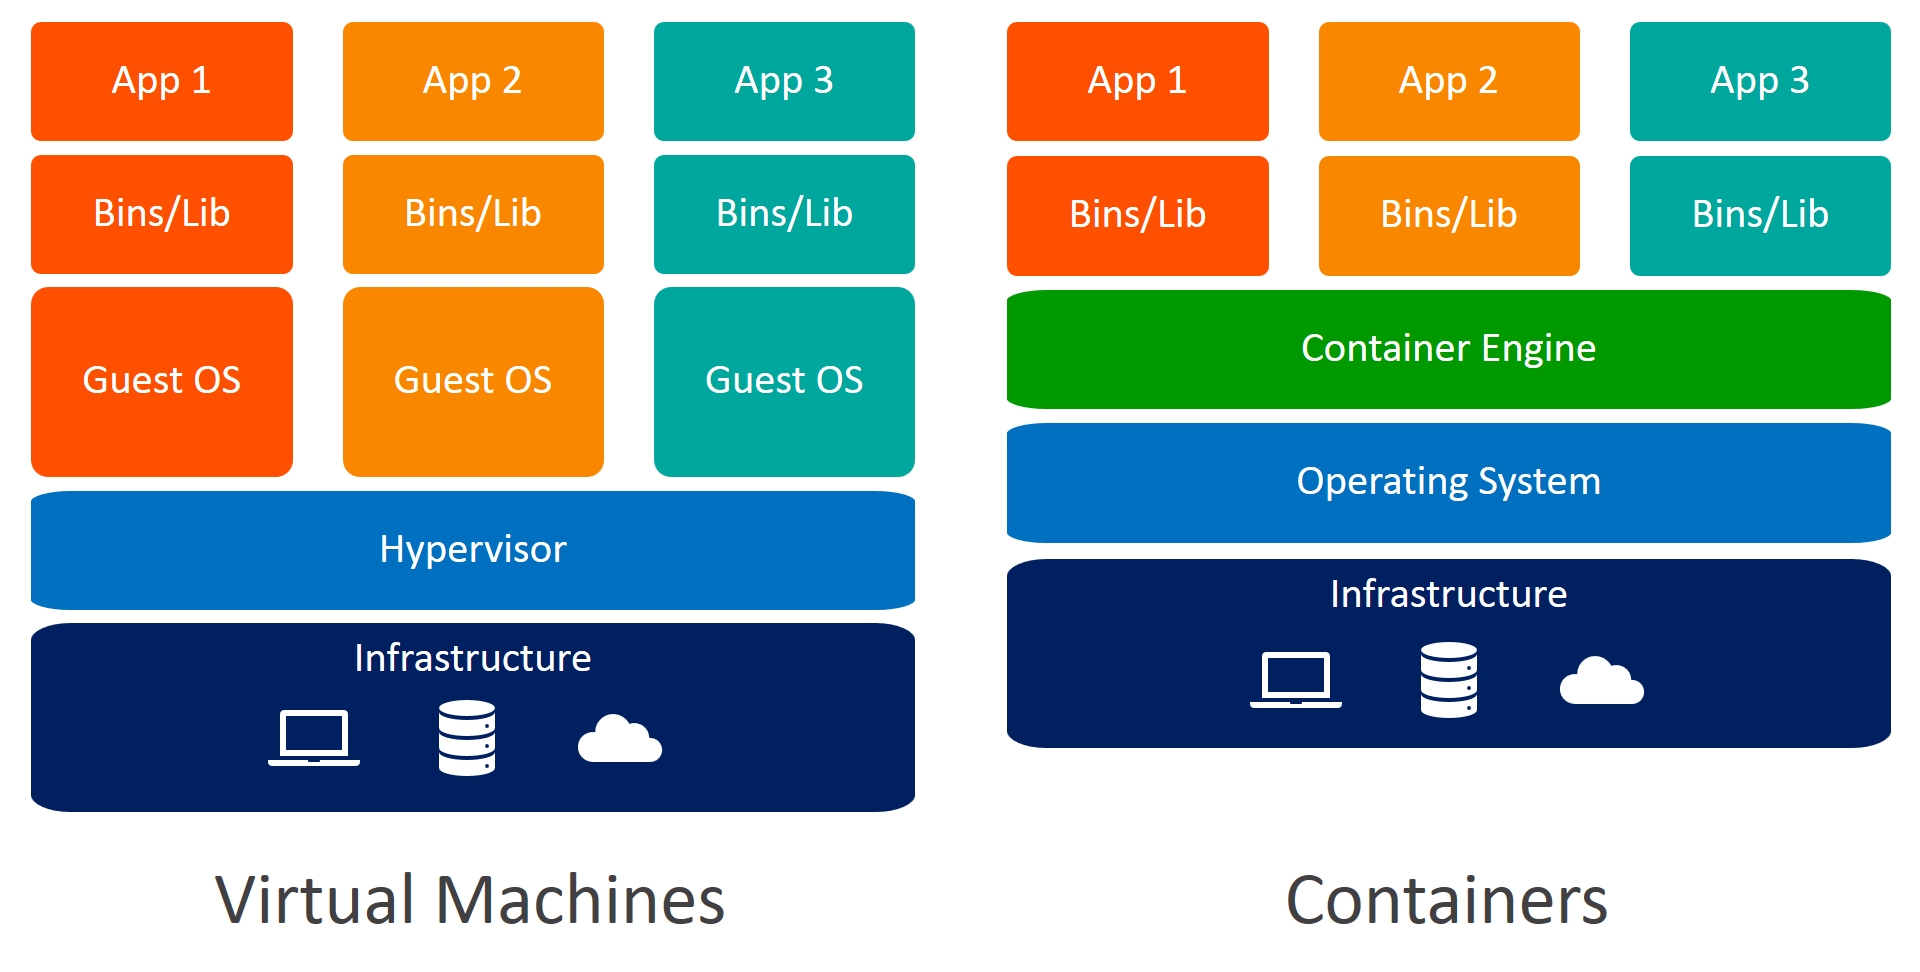
Since the virtualization technique is resource-hungry and guest OS booting time adds an overhead to the deployment, this technique is often discouraged in deployment but often encouraged in the development process in order to prevent conflicts with the libraries. Containerization on the other hand removes the resource-hungry and boot time overhead from the process.
When you install a containerization engine (iff the host OS is not Linux) in the operating system, it also set up a containerization layer on top of your OS like virtualization does but provides OS-level isolation, for example, using the same CPU and Memory but containers running in the same OS are isolated and can only interact if configured while created or via a network (services like ssh and FTP). Since it provides quick boot time for the applications, it is used to provide $0$-downtime application re-deployment which is often done when developers push new features to the production. In this case, the container will only use the resources required for the application and its dependencies. This approach is widely used for designing autoscaling for the applications in the same OS without wasting many resources.
Is Containerisation Secure than VM?
If a container is deployed with default configurations, it is mostly secure but if someone has mounted a docker socket or additional capabilities, then an attacker can easily break out of the container to read the host file system.
So if I were to tell you this in short, in virtualization each guest OS uses its own kernel and that kernel again uses the hardware emulated by the hypervisor to run the system and applications. In the case of containerization, each container is isolated by the container runtime and the kernel of the host machine is used. In this case, isolation is done by the combination of pivot root and chroot. To learn about chroot in detail, I recommend you to read Breaking out of CHROOT Jailed Shell Environment
Interacting with Docker
By default, docker exposes a Unix Domain Socket. You need to either run the docker CLI via root user or add docker group to the current user
usermod -aG docker $USER
newgrp docker
Adding a current user to the docker group
After you have added yourself to the docker group, it's a good practice to restart the docker service
sudo systemctl restart docker.serviceRestarting the docker service via systemctl
To make things easy, I will stick to the following
- Pulling image of digitalocean/flask-helloworld from remote registry
- Looking for local images
- Create a container with configs to export 5000 ports on 1337 and run in the background
- Start the docker container by name or its ID
- Accessing the 1337 port on localhost
For the knowledge to solve the labs, I will be showing you the above 5 actions using Unix Socket, TCP networking and HTTP API
Using Docker CLI and Unix Socket
First of all, pull the docker image from the remote docker hub registry using the pull command
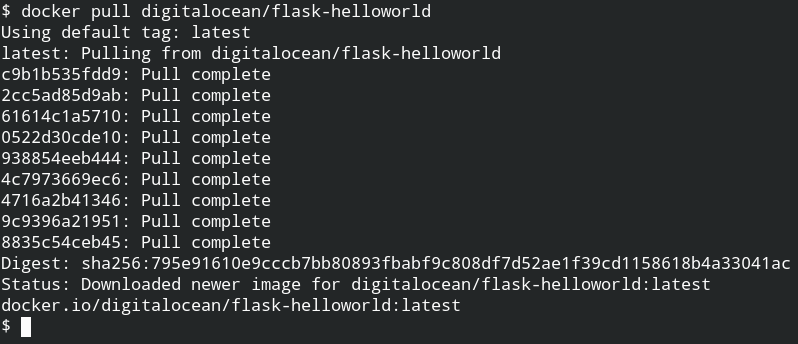
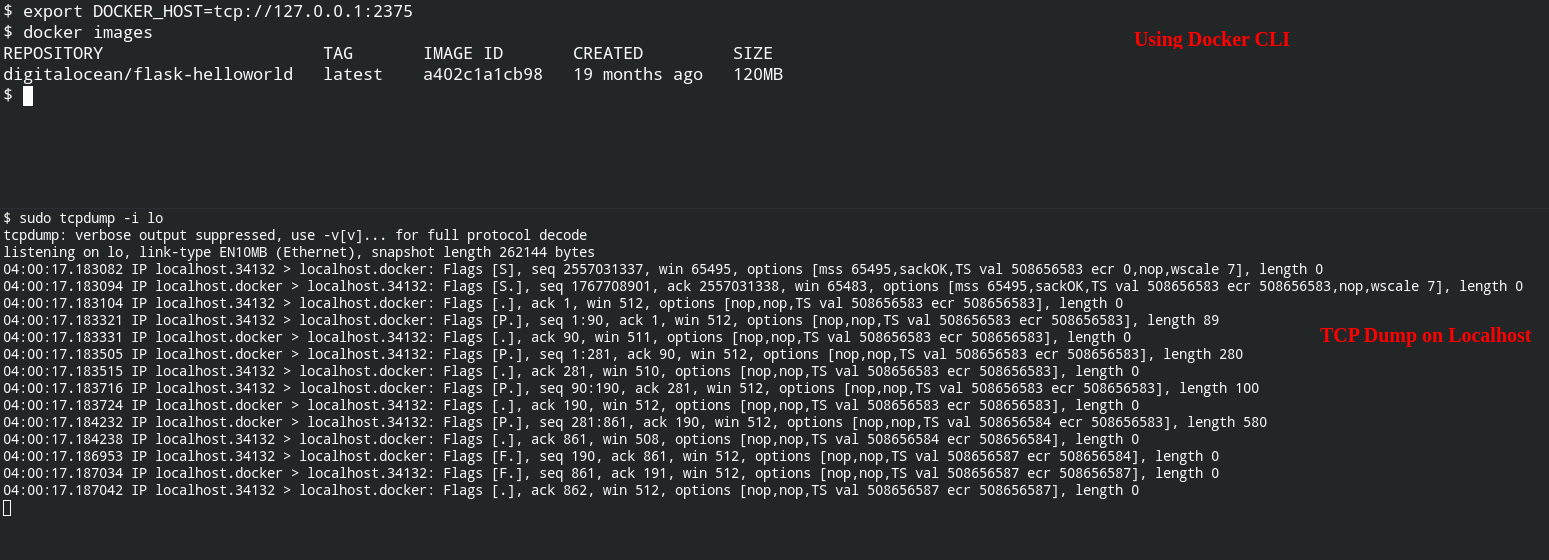
Once the image is pulled from the remote docker repository, you can use it as much as you want in your localhost without using internet access. To ensure whether it exists in your local system or not, you can use the images command to list all the available images

The default tag for images is latest. An image can have multiple tags, it is used basically used for versioning of the image. You can now reference this image by its name (under repository column) or image id
To create a docker container, you need to use create command followed by the reference of the image with appropriate arguments as described in the help documentation.
In return, the command will give you an ID of the container. You can confirm this action by using the container ls command with an -a option to list all the containers

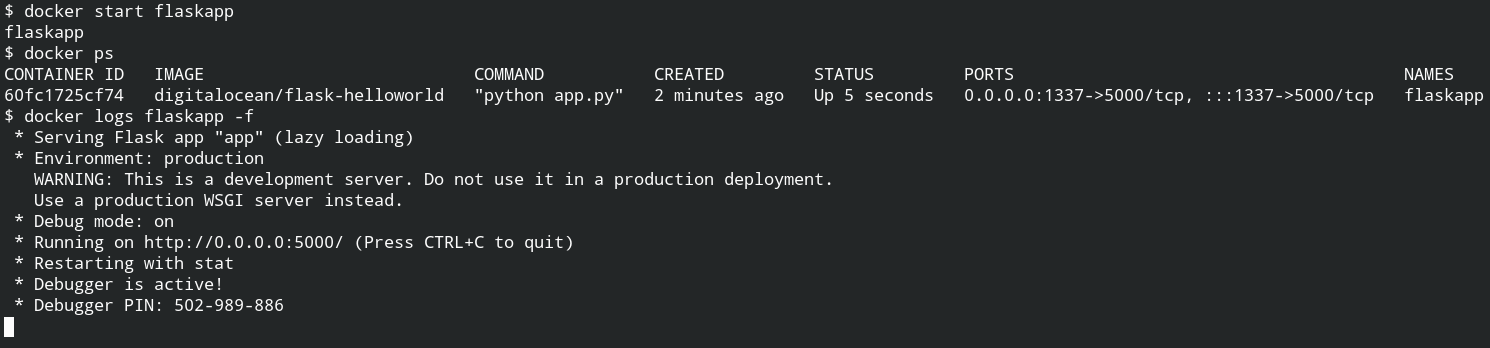
It's time to start the container with the name we have set while creating. You can also do this with its ID, but for ease let's use the name. To ensure its running status, later you can use the ps command and logs command to get the output from stderr or stdout
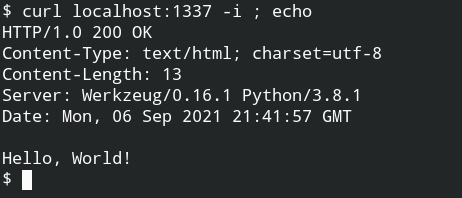
Using curl command with -i flag to make a request to the flask server through localhost 1337 port.
Using Docker CLI and TCP Socket
You need to first enable the TCP networking in docker. This can be done by editing the docker systemd unit file. Update the unit file as shown below and then after reloading the units using systemctl daemon-reload
- ExecStart=/usr/bin/dockerd -H fd://
+ ExecStart=/usr/bin/dockerd -H fd:// -H tcp://127.0.0.1:2375
Diff for /lib/systemd/system/docker.service file
To use the TCP socket you need to explicitly tell docker by setting DOCKER_HOST environment variable to tcp://127.0.0.1:2375
-H tcp:// to expose the Docker daemon can give full access to your system through remote. Use it only in private, trusted networks for educational purposes, and always secure it properly.Using Curl and Docker HTTP API
When you will start the TCP socket it will also enable the HTTP API to interact with docker on the same port. The information exchange is done in JSON format and all the endpoints are documented here – https://docs.docker.com/engine/api/v1.41/
Since we have already pulled the image, I will be using the same image. So first let's list the images and containers. The endpoints of containers and images are listed – List Containers and List Images

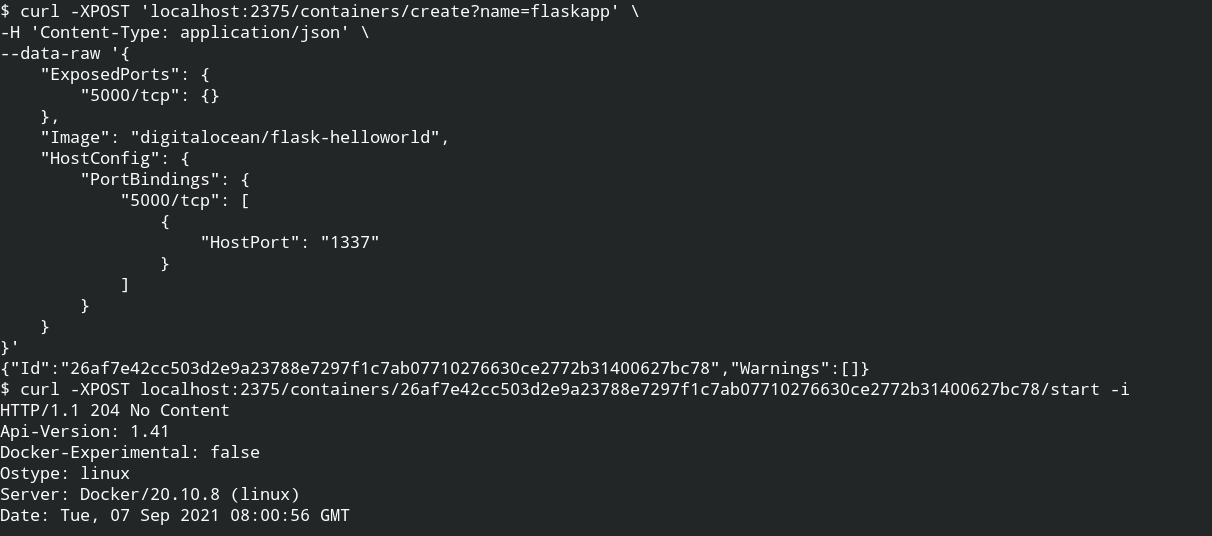
Let's reuse the container name flaskapp, but the name is already used and the container is running. To reuse the old name of the container, you need to stop and delete the container

Now you need to create the container and then start it by the ID from the response of the create container endpoint.
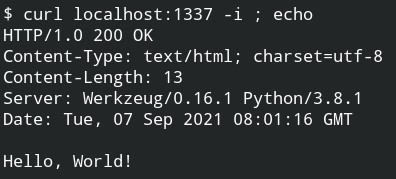
Now you can use curl to hit a request on the container from localhost on pot 1337.
Privileged Container vs Normal Container
When you will look deep into the CLI options or the container architecture, there would is a concept of privileged containers. In this section we will learn that in detail and how a privileged container
In the normal case, you have seen the isolation is done on the OS level and this is managed by the runtime engine. It acts as a bridge between OS and the containers to pass syscalls to the kernel and use the host resources efficiently.
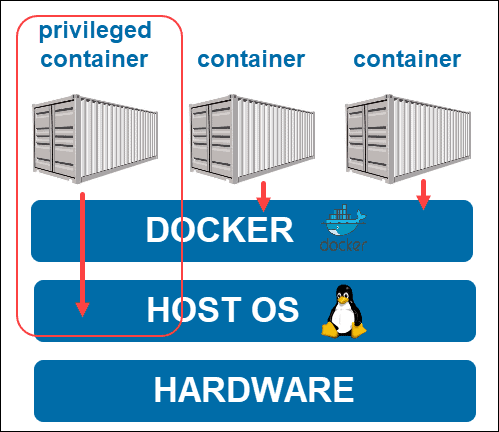
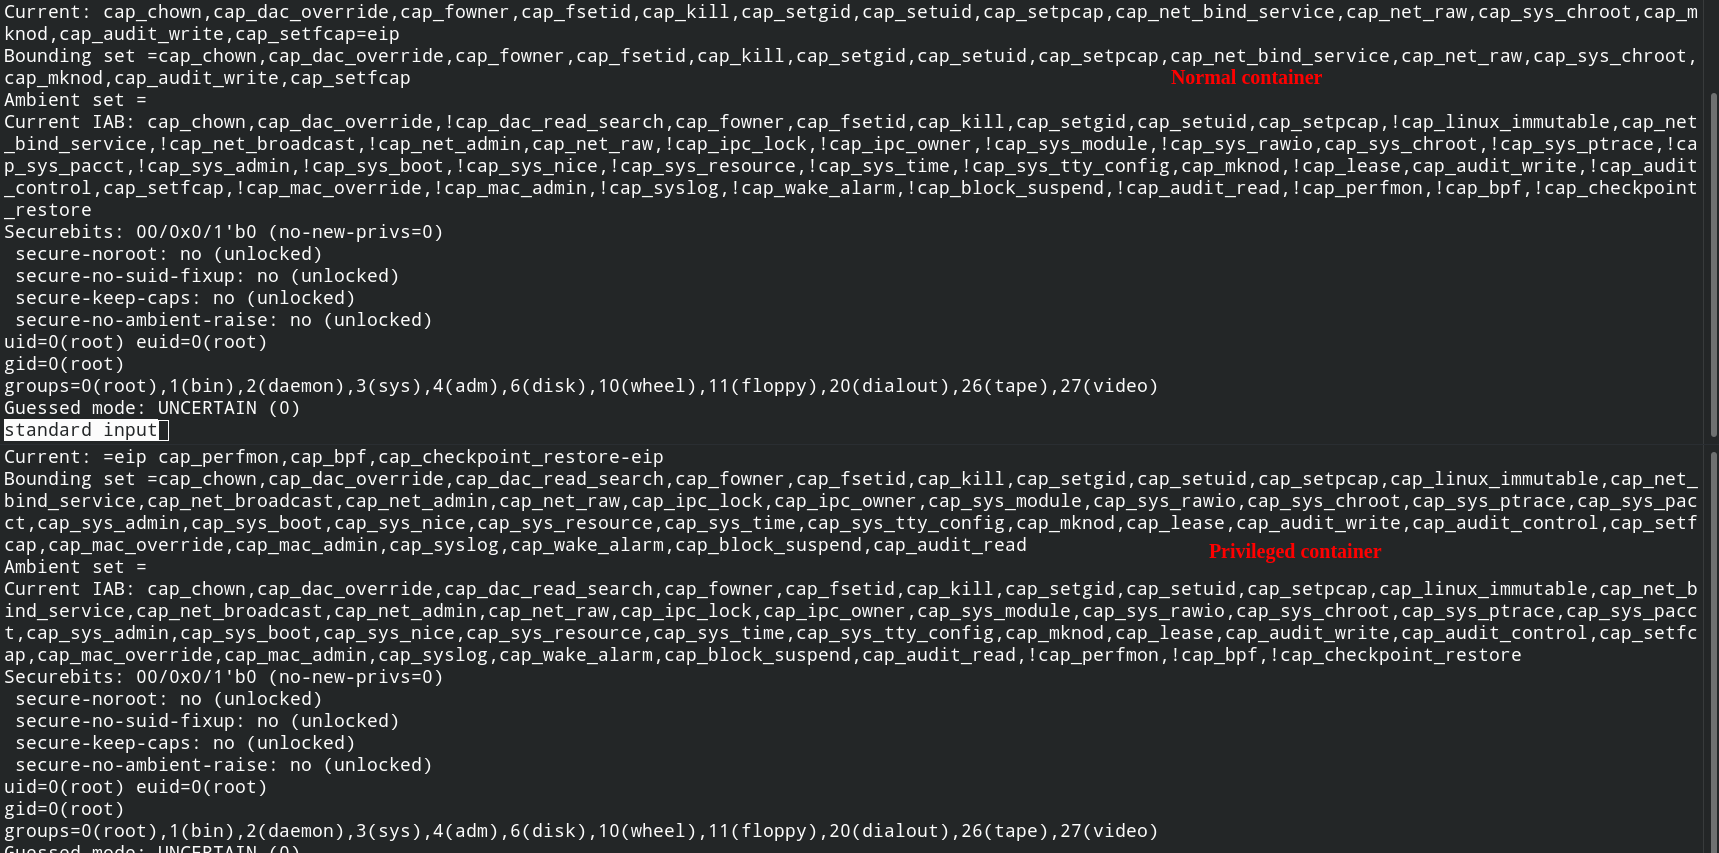
When you run a docker container in privileged mode, it will have direct access to your host OS through the runtime engine layer. Since it can interact with the host OS, the container will inherit all the capabilities of the root user and the file system of the host. At this time, breaking out would be a piece of cake. To run a container with extra privileges, you need to pass the --privileged flag while creation the container. The comparison between capabilities are shown below
Trendmicro has already discussed the problems related to privileged containers – https://www.trendmicro.com/en_in/research/19/l/why-running-a-privileged-container-in-docker-is-a-bad-idea.html
To learn more about docker, I recommend you to practice the following labs