Writing AppArmor Profile from Scratch
Get a detailed walkthrough about writing the profile for a custom binary from scratch using AppArmor utilities like aa-genprof and aa-autodep


You can get almost every profile for AppArmor on the community forum or the project author but the good part of it is that the suite provides some tools for writing your profile from the scratch both interactively (using audit log) and with the help of templates.
In this post, I will teach you how to write a program profile for the cat program which will prevent it from reading the contents of /etc/passwd and /etc/group file but can read any other file in /tmp directory and home directory. For demonstration, I will be using the lab from AttackDefense. In the lab, you will learn about preventing the /bin/rcat program from accessing contents of /etc/passwd and /etc/group files but allowing access to the current user home directory and temp directory.
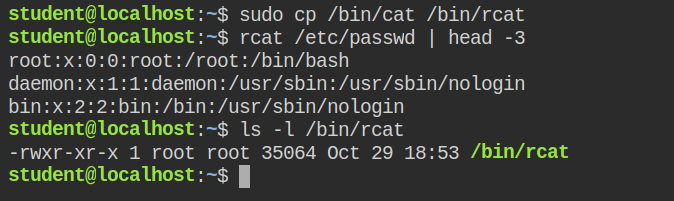
Since we will be using the cat program frequently in this lab, applying profiles directly for the /bin/cat will be a bad idea. That is why let's have a copy of /bin/cat as /bin/rcat.
cat -> rcatBefore moving forward here are some important point for profile definition that provides granular control over programs
-
You can include both absolute paths or glob patterns. For example, you can either add the absolute path
/etc/passwdor you can have all the files included via glob pattern/tmp/* -
You can have one or multiple access types on the file from the following list
- r ⇒ provides read access on the file
- w ⇒ provides write access on the file
- m ⇒ memory map as executable. It is used for programs file or
*.sofiles - k ⇒ locking of times. This is usually used where more than one process might open the file, for instance
/tmpdirectory. It is used in conjunction with write access most of the time - l ⇒ provides creation for symlinks
There are more permissions such as
ix,Px,CxandUxbut in most cases above mentioned are used -
Also supports access controls of capabilities, networking, DBus, PTrace and UNIX domain sockets.
-
Variables are also supported in the profile, for example
@{MY_VAR}. Some common variables are defined in/etc/apparmor.d/tunables/global. You can have#include <tunables/global>macros at the beginning of the file -
Explicit deny rules are supported. This we have already discussed in the last post
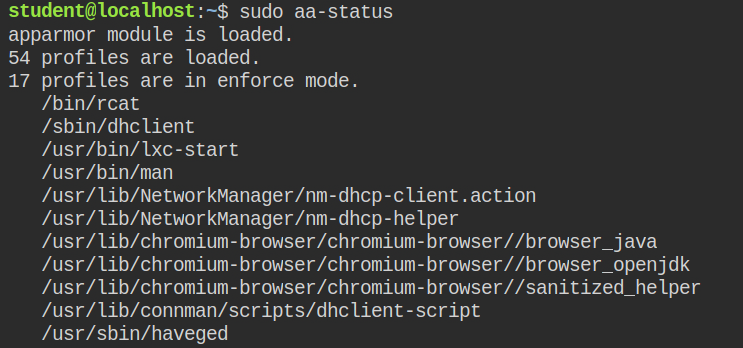
Generating Profile for /bin/rcat
There are two ways to create the profiles for a program
-
Using
aa-genprofallows you to create a profile and mark the binary as an audit. Then after it will ask you to execute the binary and this will generate logs in the/var/log/audit/audit.logfile. It will then scan this file and automatically show you entries and options for it.This is used for programs/applications that run
for a finite amount of time (e.g. web browser, mail client) and in this case, /bin/rcat -
Using
aa-autodepallows you to create a profile affecting multiple programs that runs indefinitely or continuously across reboots. For example, web servers and etc.
Since in this the command will one for a finite time, we will use aa-genprof command for generating the profile. To start with profile generation execute the command followed by the path of the program sudo aa-genprof /bin/rcat. This is to create a basic profile file and flag it with complain.
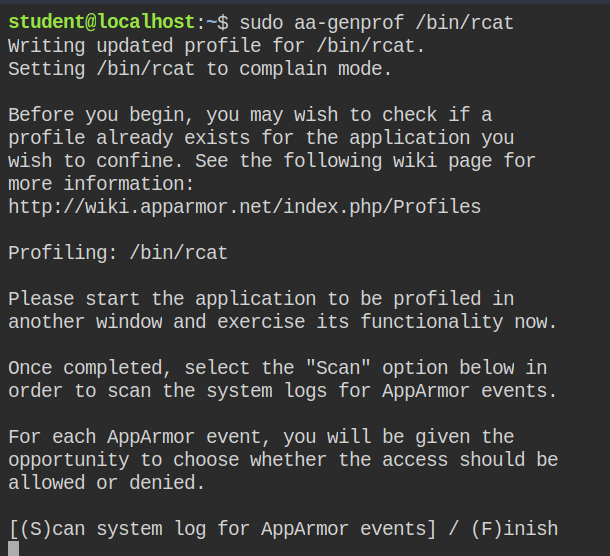
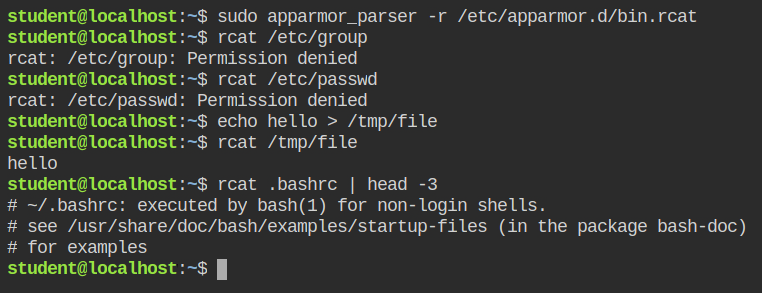
AppArmor will ask you to execute the program and then monitor its activity in the audit log file. Now open the second terminal and execute the following commands one-by-one.
$ rcat /etc/passwd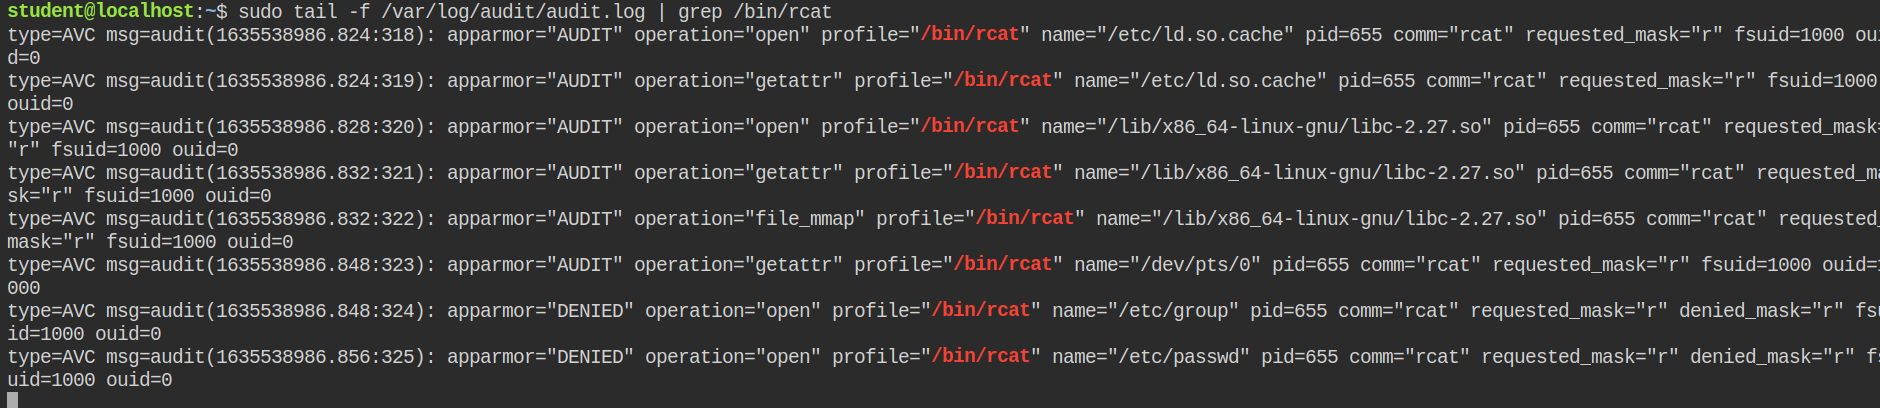
$ rcat /etc/groupThis will get executed because the current profile is in complain mode and AppArmor do allow programs in the complain mode. You can see the logs of rcat command getting filed in the /var/log/audit/audit.log on behalf of AppArmor

Reading from Audit Log file to Setup Control Lists
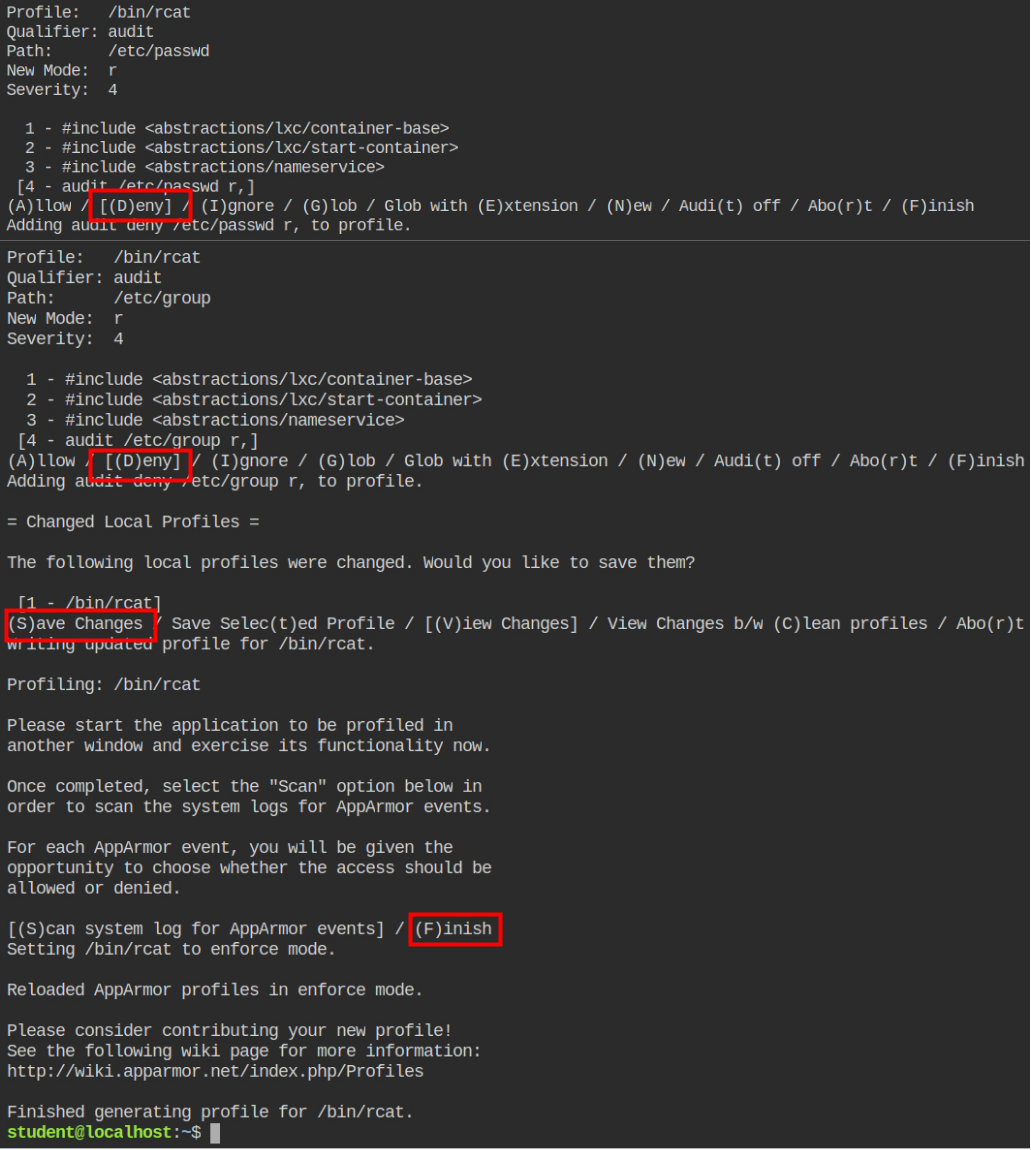
Now go back to the terminal where you launch the aa-genprof command and press the S key. This will automatically parse the file for you and give you prompts to select files and options. You can use the UP and DOWN arrow keys to navigate through the file names and keys to select the rule action.
In the following picture, I have selected the entry for the /etc/passwd file first, then selected t for setting audit flag for the entry and then press D or d (selection is case insensitive) to deny the read access on the file. Then I have done the same for the /etc/group file and lastly pressed S to save the configuration and F to finish the execution and aa-genprof and reload the profile
So till now, we have done what the lab description has asked for. But let's move further to explore the glob patterns and manual editing of the profile files. This will give you a thorough understanding of how profiles work and are edited without the help of audit logs.
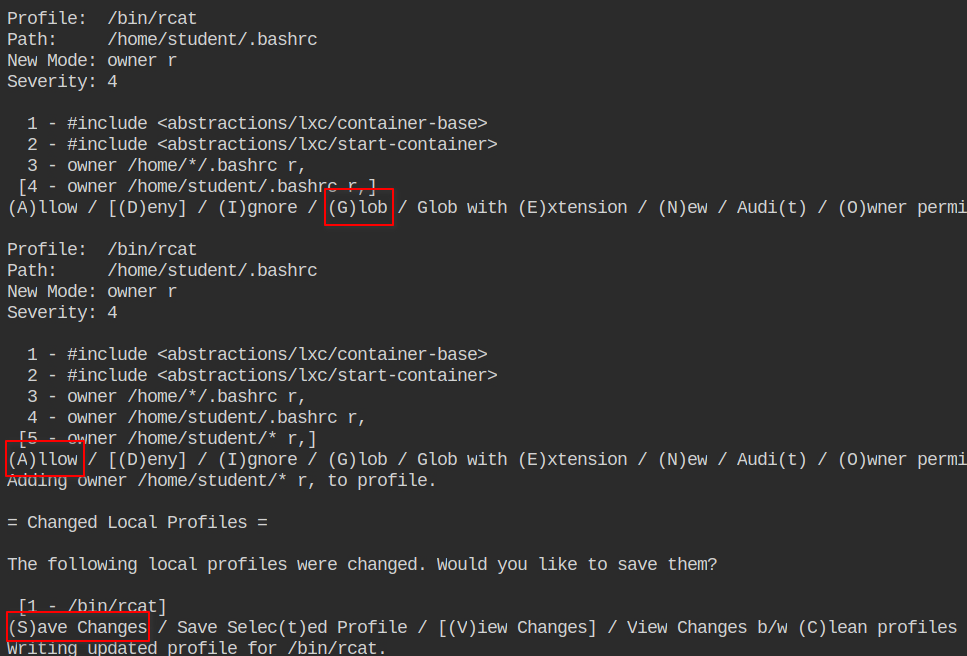
Execute the rcat command in your home directory now, rcat /home/student/.bashrc. This will give you permission denied error in the starting because the entry of rcat'ing in the home directory is not added in the profile definition, and AppArmor works on the whitelisting mechanism. So if you have any rule in the profile which is "allowed" it will pass on that to the command otherwise it will give you a "Permission denied" error and create a log in the audit log.
Now run aa-logprof followed by the profile name /etc/apparmor.d/bin.rcat. This will now read the contents from the audit file and match the profile file to show you only the commands and parameters that are not yet profiled. You are now familiar with this interface and follow the instruction in the picture shown below.
Will now reload the profile automatically for you but for the safe side let's reload it manually by apparmor_parser command.
$ sudo apparmor_parser -r /etc/apparmor.d/bin.rcatbin.rcat profileNow if you will check the status of profiles, the bin.rcat comes under enforce mode. This means if you run this command AppArmor will block all the access for /etc/{passwd,group} file and allow you to read any file in the home directory
Now the updated contents of your profile file would look like the following. Every time you use file permissions it gets appended to the file by aa-logprof.
#include <tunables/global>

/bin/rcat {
  #include <abstractions/base>

  audit deny /etc/group r,
  audit deny /etc/passwd r,

  /bin/rcat mr,
  /lib/x86_64-linux-gnu/ld-*.so mr,
  owner /home/student/* r,

}Furthermore, you can try to use @{HOME} variables from #include <tunables/global> profile with owner permission as an experiment. Give the RW access to the world on some other user in the /home/ and try to read the file in that directory with rcat.
Allowing Extra Directories
Users often use /tmp/ directory to store volatile data like some command output or download a file that is not required to be persisted.
Now open the file /etc/apparmor.d/bin.rcat by vim and add the following line (in green colour) after owner /home/student/* r,. Keep in mind you have to follow the trailing comma sign otherwise parser would throw an error
owner /home/student/* r,
+ /tmp/* r,/tmp/ directory using the glob patternSince you have made changes to the profile and AppArmor doesn't know about it. You have to reload this profile using sudo apparmor -r /etc/apparmor.d/bin.rcat command.
You can now see the log files for the DENIED AppArmor logs in the audit file. If this would have been in a complain mode, AppArmor would have allowed the binary to read the file contents and work like a normal cat binary but will add the logs into the audit.log file
Using /etc/* Directory in Profile with /etc/{passwd,group} Configuration
So we have a profile that has deny access defined on certain files in the /etc/ directory but for some reason let's say you have to access some config files or /etc/hosts file for reading the DNS resolutions.
In that case, adding the file paths would be so overwhelming and will make your profile look too bulky. For a fix, you can have /etc/* r, entry added after the /tmp/* r,.
/tmp/* r,
+ /etc/* r,/etc/* directory using the glob patternNow when you will test for the rcat'ing /etc/hosts and /etc/passwd, you will realise that contents of /etc/hosts are displayed but /etc/passwd file reading failed with Permission denied error. This is because when the command runs, it goes through the AppArmor profile sequentially and matches file requests.
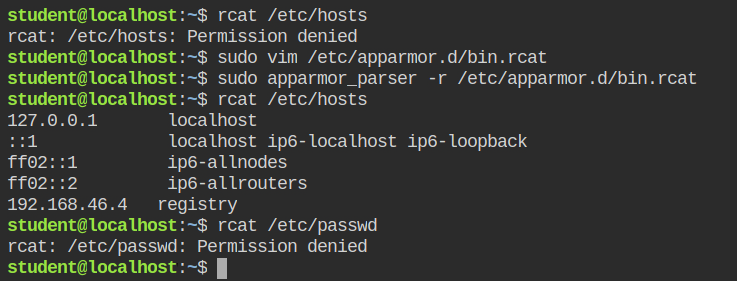
/etc/hosts and /etc/passwd