Perform Basic Image Processing using Python3 and OpenCV
Computer vision is a field of AI that enables machines to derive meaningful information from visual data like images and videos. In this post, you will get acquainted with the basics of image processing via the OpenCV library in python to change colour, resize an image etc

Hello World! In this post, I will be discussing python and computer vision for the first time. The basics of computer vision start with the tasks of image processing which includes, changing coloured images to grayscale, resizing the image and blurring the images.
Computer vision is a very vast field in machine learning and is currently used in applications like image restoration, where old black-and-white low-resolution images are restored into high definition coloured pics and enhance the medical imaging for doctors to improve the diagnosis of the diseases. In this post, you will be learning a few things on the
Overview of cv2 Library
There are other image processing libraries often discussed and compared with OpenCV are PIL and Pillow but this library fits well as it provides production-ready usage with GPU accelerated functionality and is built on top of the C++ library.
OpenCV provides a set of functions that abstract all these working of the image processing and allows you to focus on your application. I recommend you to use Pillow if you want to cut and resize images, and maybe do a bit of filtering, and you use OpenCV when you are building a robot that is trying to "see" things. Since OpenCV is actively managed and has a ton of features at our disposal, I prefer to use it instead of other image processing libraries.
Note: The detailed explanation on the working of these functions and filters are beyond the scope of this post. You will get the answer of "how-to" and "when-to" today.
Colour to Grayscale Images
In this section, I will guide you on how you can convert a coloured image to grayscale and save it to the file. First of all, you need to understand why changing colour is required? Well, when you start processing a coloured image, it has 3 different channels known as RGB (Red - Green - Blue) and each channel has a different value per pixel.
Suppose you have an image file of \( 10 \times 5 \) dimension, then actually there are \( 10 \times 5 \times 3 \) pixels. There would be a total of three 2-d matrices containing information for each colour channel. For example, as shown below
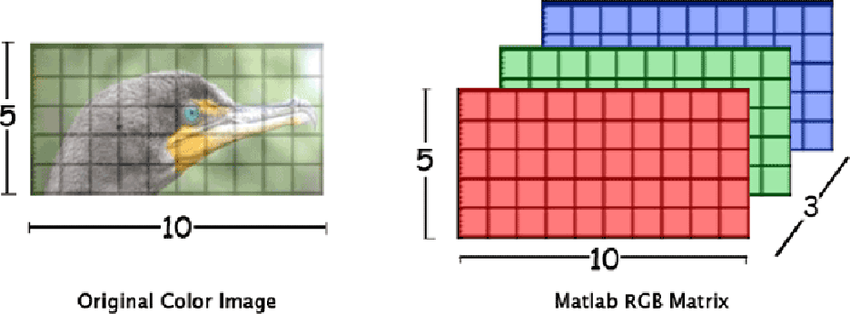
When you have the same image with a grayscale image, these 3 channels are reduced to 1 and it will make the processing faster as the program would have to only perform operations on the \( 10 \times 5 \) pixels.
Reading Image
We will start by reading the image from the file and saving it to the variable using the cv2.imread() function. This function has two input parameters - The source file name or path and the flag. The flag is used to define the reading behaviour. We want to read a coloured image, therefore it is required to tell OpenCV that include all three channels of the image and return a 3D matrix of the same by providing the cv2.IMREAD_COLOR flag to it.
def load_image(file_path):
    """
    Read a coloured image from file_path and return the 3d matrix
    """

    return cv2.imread(file_path, flags=cv2.IMREAD_COLOR)

img = load_image("Image1.jpg")Image1.jpg file and saving the 3d matrix to the img variableThere is a catch when you read coloured images. The default format of coloured images in OpenCV is BGR, which means now the Blue channel comes before the Red channel. Now, this looks odd and you must be wondering why the hell they aren't using simply RGB? Well, this library is pretty old and back then BGR format was popular. So to make it compatible with the daily usage of the developers, the author of OpenCV, Dr Gary Bradski decided to go with the BGR format instead.
Changing the Colour set of the Image
Finally, it's time to change the colour of the image to grayscale and save it into the destination file. You can change any colour to another colour set using the cv2.cvtColor(mat, flags) function which accepts two parameters - The image matrix obtained from the cv2.imread() function and colour code operation. In this case, we are supposed to change the BGR to GRAY, therefore it will be cv2.COLOR_BGR2GRAY and it will return you the single-channel grayscale image.
def colour_to_gray(mat):
    return cv2.cvtColor(mat, cv2.COLOR_BGR2GRAY)

gray_img = color_to_gray(img)BGR read format to a grayscale imageSave the Image to the New File
Once you are done with the image processing, it is recommended to save the image for future reference. You can do this by calling the cv2.imwrite(file_path, mat) function which accepts two parameters - The string value of the file name to save, it can be an absolute or the relative path and image matrix obtained after performing the image processing operations (here BGR to GRAY)
def save_image(file_path, mat):
    return cv2.imwrite(file_path, mat)

save_image("Image2.jpg", gray_img)Image2.jpg file in the current directoryResize Images
This is one of the most crucial steps in image processing because of the limitation of the machine learning models and the other similar software that perform automated information gathering from the visuals. You are required to pass a fixed size of the image as the input to the models to get the desired output, otherwise, it will simply return an error related to mismatched input dimensions. So all the images are resized to a fixed dimension, usually a squared image.
In this post, we will see how to get the current size of the image and resize the image from a minimum value of either height or width. Let's say if the height is \( h \) and width is \( w \). So, if \( h > w \), then the result size of the image should be \( w \times w \), otherwise \( h \times h \).
You can achieve this by calling the cv2.resize(mat, (w, h)) function which accepts two arguments - The original image matrix obtained after reading the image and a tuple containing the new size of the image.
There is a problem while image resizes is that when you increase the dimension from the low-resolution image, certain information can be duplicated and in the case where high-resolution image shrinked to low dimension, some information might get lost. Well, there are different interpolation methods in the resize method that can help minimize this issue. Since we are shrinking the image, it is recommended to use the INTER_AREA interpolation mode.
def resize_image(mat):
    h, w = mat.shape[:2] # get the current image size

    s = min(h, w) # get the minimum value among height and width

    return cv2.resize(mat, (s, s), interpolation=cv2.INTER_LINEAR)

 img = load_image("Image1.jpg")
resize_img = resize_image(img)Blur Image
Most of in object detection or classification it is required to focus on the main subject in the image and have its understanding predicted. Everything other than the main subject of interest is known as noise in the image. To make the computer learn about the important features in the image in less time, it is required to denoise the image by applying a blurring filter on the image. This will keep the important feature and fade away the unimportant one in the background.
Blurring can also result in information loss which was preserved in the shapen mode. Therefore, there are different types of blurring filters. But for the sake of this article, we will look into Gaussian Blur.
In the Gaussian Blur filter, the pixels near to centre are given more weightage than the pixel farther than that. This means it is required to provide a 2D matrix kernel as the filter of an odd number of dimension sizes and it also means that the greater size of the filter is, the more blurry image would become. Let's use cv2.GaussianBlur(mat, (x, y), sigmaX) function from OpenCV which accept three required parameters - The image matrix obtained after reading the image, filter with a dimension of the 2D matrix in odd numbers only and the sigmaX, which if provided 0, will be automatically calculated by the function.
def blur_image(mat, kernel=(25, 25)):
   return cv2.GaussianBlur(mat, kernel, 0)

img = load_image("Image1.jpg")
blur_img1 = blur_image(img)         # using default (25, 25) kernel
blur_img2 = blur_image(img, (7, 7)) # using (7, 7) kernelCode in Action 🚀
You can try out the code below and tinker with it to learn more about it. Feel free to add more images to the /Images/Source directory and learn the behaviour of these functions.
Resouces
- https://www.geeksforgeeks.org/python-opencv-cv2-imshow-method/?ref=lbp
- https://www.geeksforgeeks.org/python-opencv-cv2-imread-method/?ref=lbp
- https://www.geeksforgeeks.org/python-opencv-cv2-cvtcolor-method/?ref=lbp
- https://www.geeksforgeeks.org/python-opencv-cv2-imwrite-method/?ref=lbp
- https://learnopencv.com/why-does-opencv-use-bgr-color-format/
- https://www.analyticsvidhya.com/blog/2021/08/sharpening-an-image-using-opencv-library-in-python/
- https://datacarpentry.org/image-processing/06-blurring
- https://setosa.io/ev/image-kernels/